How to use the Create Primers tool
To run Create Primers, go to:
Tools | Genome Finishing Module (![]() ) |
Create Primers (
) |
Create Primers (![]() )
)
This opens the dialog shown in figure 5.1.
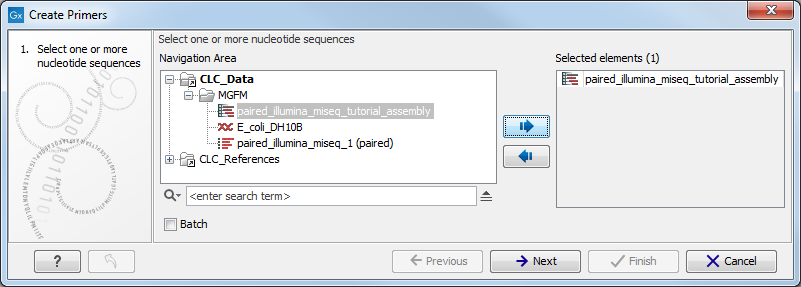
Figure 5.1: Select any number of contigs or sequences.
Select any number of sequences or contigs and click Next. This opens the dialog shown in figure 5.2.
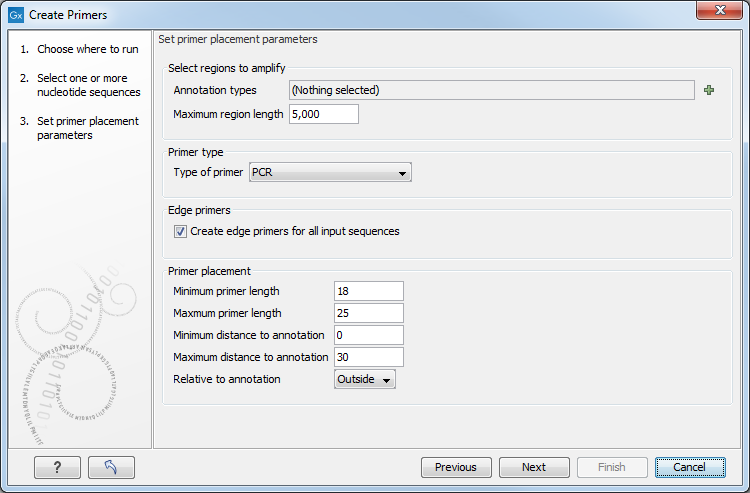
Figure 5.2: Set primer placement parameters.
The parameters to be specified in this step are:
- Set regions to amplify
- Start out by clicking on the "Select annotation type icon" (
 ) to specify which annotation types to be included in the primer design.
- Maximum annotation length. Allows specification of the maximal length of annotations that will be considered for primer design. Annotations above this length will not be considered for primer design.
- Start out by clicking on the "Select annotation type icon" (
- Primer type
- Type of primer. Two types of primers can be created. The PCR primer option creates a primer pair around a target region (see figure 5.4). The sequencing primer option creates a single primer sequence for a target region on either the forward or the reverse strand (see figure 5.3).
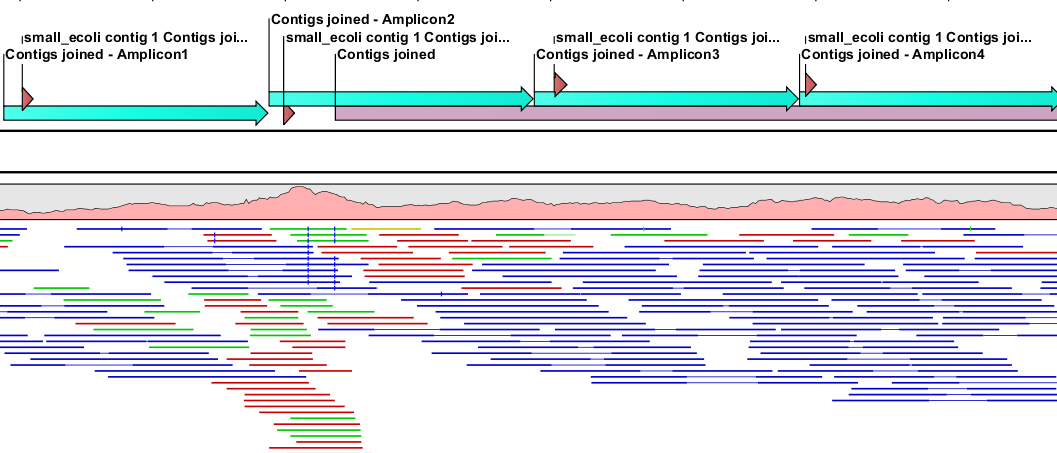
Figure 5.3: A region covered by evenly spaced sequencing primers on the forward strand. The target region Contigs joined is covered by 400bp amplicons and for each amplicon, a sequencing primer has been created inside the start of the amplicon.
- Type of primer. Two types of primers can be created. The PCR primer option creates a primer pair around a target region (see figure 5.4). The sequencing primer option creates a single primer sequence for a target region on either the forward or the reverse strand (see figure 5.3).
- Edge primers
- Create edge primers for all input sequences. When ticking this box, primers pointing out of all input sequences are created.
- Primer Placement
- Minimum primer length. Allows specification of the prefered minimum primer lengths.
- Maximum primer length. Allows specification of the prefered maximum primer lengths.
- Minimum distance to annotation. Allows specification of the prefered minimum distance from primer to target region.
- Maximum distance to annotation. Allows specification of the prefered maximum distance from primer to target region.
- Relative to annotation. Allows specification of whether primers should be targeted indside (figure 5.4) or outside (figure 5.5) the selected annotation.
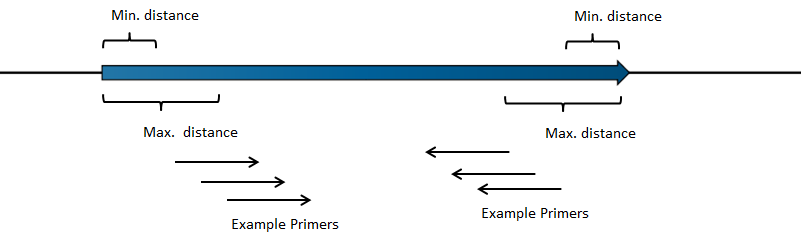
Figure 5.4: Illustration of how inside PCR primers are positioned.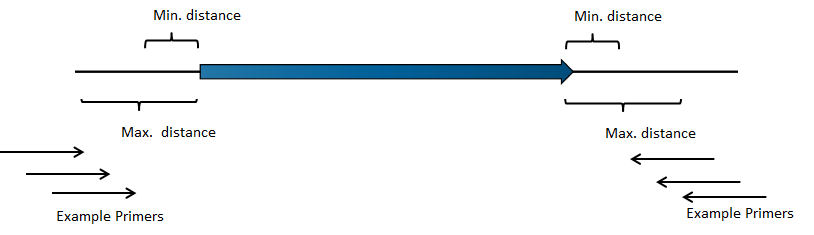
Figure 5.5: Illustration of how outside PCR primers are positioned.
Note! It is not possible to create primers that span two exons.
Clicking Next leads to the next set of parameters to be specified (figure 5.6).
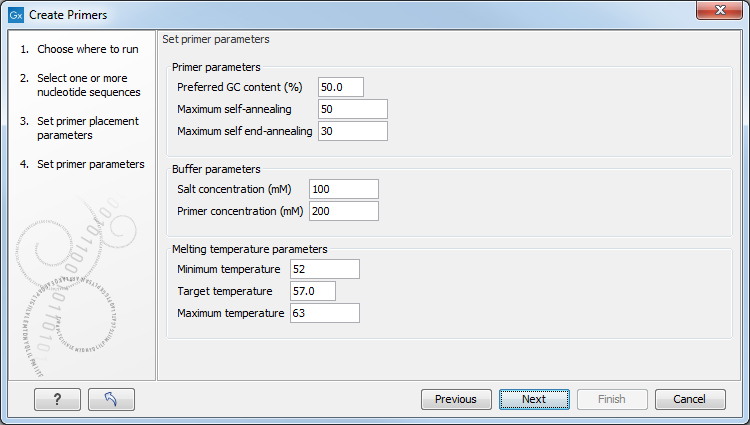
Figure 5.6: Set parameters for primer conditions.
- Primer parameters
- Preferred GC content (%). Specify the desired percentage of guanine and cytosine nucleotides in the primer.
- Maximum self-annealing. Specify the maximal accepted number of hydrogen bonds in case of self annealing.
- Maximum self end-annealing. Specify the maximal accepted number of hydrogen bonds in case of self end-annealing.
- Buffer parameters
- Salt concentration mM. Specify the desired salt concentration in the buffer in mM.
- Primer concentration nM. Specify the desired primer concentration in nM.
- Melting temperature parameters
- Minimum temperature. Primers with a melting temperature below this limit are rejected.
- Target temperature. The desired melting temperature of the primers.
- Maximum temperature. Primers with a melting temperature above this limit are rejected.
After adjusting the parameters click Next. This opens the dialog shown in figure 5.7.
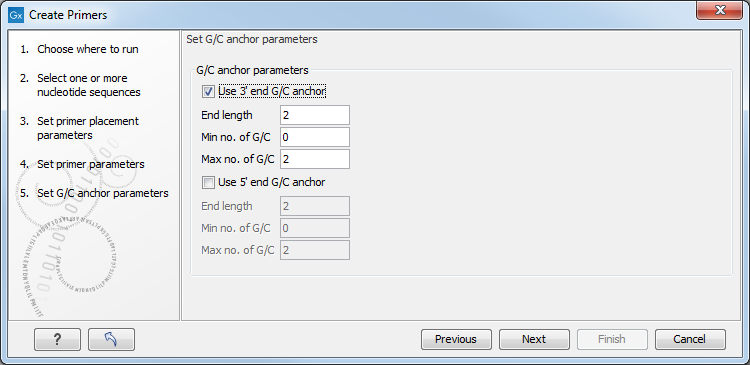
Figure 5.7: Set G/C anchor parameters.
- G/C anchor parameters
- Use 3' end G/C anchor parameters. Checking the box makes it possible to specify the preferred number of G/C occurrences at the 3' end of the primer.
- End length. The number of consecutive bases to consider at the 3' end.
- Min no. of G/C. The minimum number of G/C's in the considered interval.
- Max no. of G/C. The maximum number of G/C's in the considered interval.
- Use 5' end G/C anchor parameters. Checking the box makes it possible to specify the preferred number of G/C occurrences at the 5' end of the primer.
- End length. The number of consecutive bases to consider at the 5' end.
- Min no. of G/C. The minimum number of G/C's in the considered interval.
- Max no. of G/C. The maximum number of G/C's in the considered interval.
- Use 3' end G/C anchor parameters. Checking the box makes it possible to specify the preferred number of G/C occurrences at the 3' end of the primer.
Adjust the parameters and click Next. This opens the dialog shown in figure 5.8.
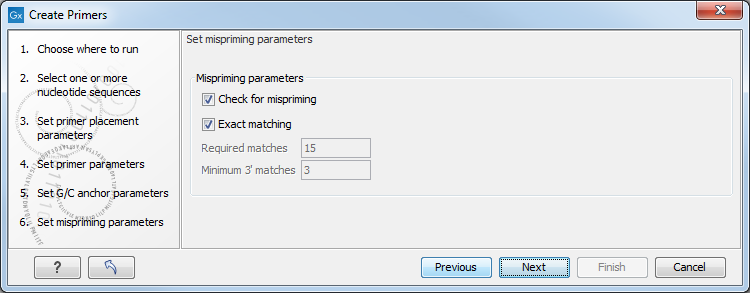
Figure 5.8: Set mispriming parameters.
- Mispriming parameters
- Check for mispriming. Select whether check for mispriming should be performed. If the option is checked, the mispriming primer is excluded from the analysis, and the next on the ranked list is considered. When disabled, the running time of the tool is reduced
- Exact matching. When ticked, only unique primers with a perfect match are created. When disabled, detailed parameters needs to be specified for "Minimum number of base pairs required for a match" and for the "Number of consecutive base pairs required in the 3' end". Disabling this option can increase the running time of the tool significantly. Note The check for mispriming is done on all input sequences, so one can check for mispriming on a reference genome by simply adding the genome to the input of the tool.
Adjust the parameters and click Next. This opens the dialog shown in figure 5.9.
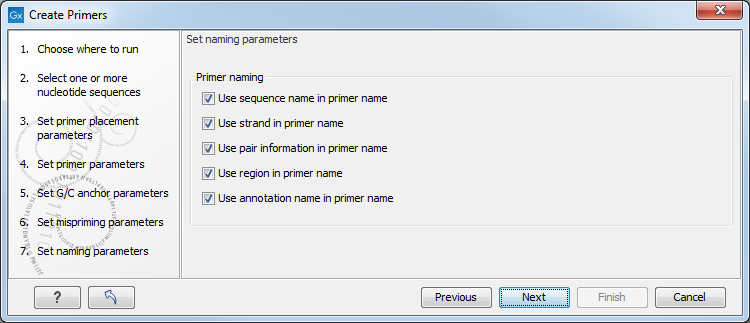
Figure 5.9: Set primer naming parameters.
- Primer naming
- Use sequence name in primer name. The sequence name is the name the sequence is created from.
- Use strand in primer name. Add the primer strand to the primer name.
- Use pair information in primer name. Add pair numbering to the primer name.
- Use region in primer name. Add the primer region to the primer name - e.g. (9842-9942).
- Use annotation name in primer name. Add the annotation name to the primer name.
After the Result handling step, click Finish.
Subsections