Navigation Area
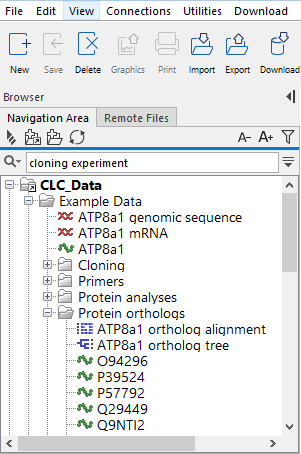
The Navigation Area (figure 3.1) is used for organizing and navigating data.

Figure 3.1: The Navigation Area.
Each CLC data element has a name and an icon that represents the type of data in the element. A list of many of the icons and the type of data they represent can be found at https://qiagen.my.salesforce-sites.com/KnowledgeBase/KnowledgeNavigatorPage?id=kA41i000000L5uFCAS.
Non-CLC files placed into CLC locations will have generic icons beside them, and any suffix in the original file name will be visible in the Navigation Area. (e.g. .pdf, .xml and so on.)
Elements placed in a folder (e.g. by copy/pasting or dragging) are put at the bottom of the folder listing. If the element is placed on another element, it is put just below that element in the folder listing. If an element of the same name already exists in that folder, a copy is created with the name extension "-1", "-2" etc. See Moving and copying elements for further details.
Elements in a folder can be sorted alphabetically by right-clicking on the folder and choosing the option Sort Folder from the menu that appears. When sorting this way on Windows, subfolders are placed at the top of the folder with elements listed below in alphabetical order. On Mac, subfolders and elements are listed together, in alphabetical order.
Opening and viewing CLC data elements is described in View Area.
Just above the data listing area is a Quick Search field, which can be used to find elements in your CLC Locations. See Quick search.
Just above the Quick Search field are icons that can be clicked upon. On the left side, from left to right:
- Collapse all (
 ). Close all the open folders in the Navigation Area.
- Add File Location (
 ). Add a new top level location for storing CLC data. See Adding locations for further details.
- Create Folder (
 ) Create new folders within an existing CLC Location.
- Update All (
 ) Refresh the view of the Navigation Area.
On the right side, from left to right:
- Decrease font size (
 ) and increase font size (
 ) Decrease or increase the font size in the Navigation Area, both in the left hand side of the Workbench and other locations, such as launch wizards steps where data elements can be selected. The font size in the Tools, Workflows and Favorites tabs in the Toolbox, just below the Navigation Area, are also adjusted.
- Restrict data types listed (
 ) Click on this icon to reveal a list of data types. Selecting one of these types will result in only elements of that types, and folders, being shown in the Navigation Area. Click on it again to and select "All Elements" to see all elements listed once more.
- Hide the Navigation Area and Toolbox (
 ). This icon is at the top, right hand side. Clicking on it hides the Navigation Area and the Toolbox panels, providing more area for viewing data. To reveal the panels again, click on the (
 ) icon that is shown when the panels are hidden.
Data held on a CLC Server
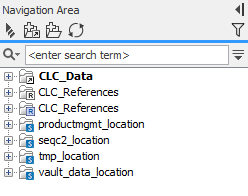
If you have logged into a CLC Server from your Workbench, then data stored on the CLC Server will also be listed in the Navigation Area ( figure 3.2).

Figure 3.2: Data locations on a CLC Server are highlighted with blue square icons in the Navigation Area.
Locations on a CLC Server are configured by the server administrator.
When you launch a job to run on the CLC Main Workbench, you can choose data located in CLC Main Workbench File Locations or in CLC Server File Locations. When running jobs on a CLC Server, you can only select data in locations known to the server (see Running a tool on a CLC Server).
Subsections
- Data structure
- Adding and removing locations
- Data sharing information
- Create new folders
- Multiselecting elements
- Copying and moving elements and folders
- Updating element and folder names
- Delete, restore and remove elements
- Show folder elements in a table
