Entering barcodes
Barcodes can be entered manually or imported from a properly formatted CSV or Excel file.
Manually enter barcodes
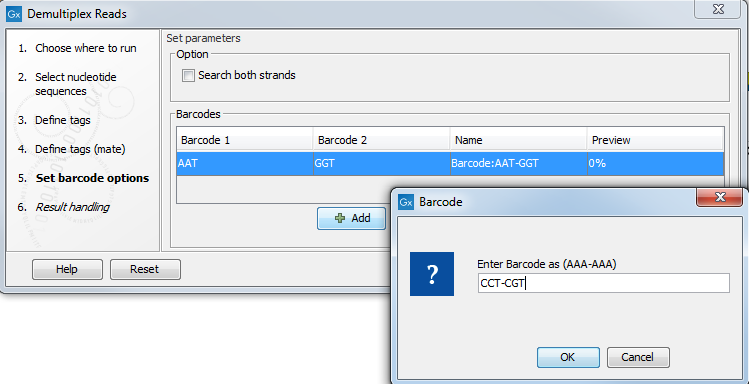
Barcodes can be entered manually when launching the Demultiplex Reads tool by clicking the Add (![]() ) button in the "Set barcode options" wizard step. In the example shown in figure 25.22 the barcodes should be defined as shown in figure 25.25.
) button in the "Set barcode options" wizard step. In the example shown in figure 25.22 the barcodes should be defined as shown in figure 25.25.

Figure 25.25: The barcodes for the set of paired end reads for sample 1 have already been defined and the barcodes for sample 2 is being entered in the format AAA-AAA, which corresponds to Barcode1-Barcode2 for sample 2 in the example shown in figure 25.22.
You can edit the barcodes and the names by clicking the cells in the table. The barcode name is used when naming the results.
Import barcodes from CSV or Excel format files
If running the Demultiplex Reads tool, click on the Import (![]() ) button in the "Set barcode options" wizard step.
) button in the "Set barcode options" wizard step.
When importing barcodes this way, the input format consists of two columns: the first contains the barcode sequence, the second contains the name of the barcode. An acceptable CSV format file would look like:
| "AAAAAA","Sample1" |
| "GGGGGG","Sample2" |
| "CCCCCC","Sample3" |
For Demultiplex Reads within a workflow, barcodes can only be entered using a CSV or Excel format file, which can be selected when launching the workflow. The format of the file can be as simple as two columns, the first with the barcode sequences, the second with the names of the barcodes, as described above. However, in a workflow context, the file can optionally contain a header, and more columns. Columns not defining the barcode and sample name are interpreted as metadata and can be used for defining batch units. See Defining batch units when using Demultiplex Reads for further details.
