Configuring automation settings
Automation settings are configured by selecting a workflow in the list of active workflows on the Workflows tab (see figure 3.2) and clicking Configure (note that automation settings cannot be modified while automation is currently running for the selected workflow).
See Automation configuration concept definitions for definitions of concepts used when configuring automation for the workflow.
See below for a description of the available settings shown in figure 5.1.
Note: Configuring the automation settings requires that the chosen sequencer folder already contains a representative sequencing run.
Note: When configuring automation for multiple workflows, a menu containing settings already in use can be expanded by clicking the arrow in the input field. After selecting a setting, it must be updated to match the workflow being configured (e.g. the ID used in the workflow matcher setting).
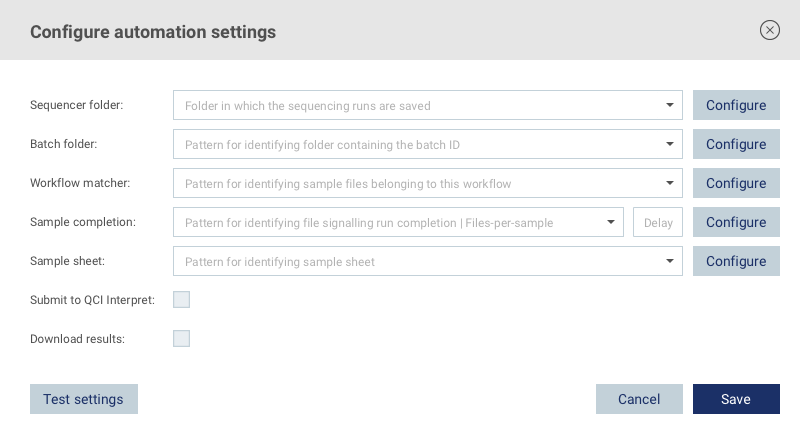
Figure 5.1: Automation settings
Cloud account
This setting is used to determine whether the connector should monitor a local filesystem or a cloud account for new sample files. Only cloud accounts with support for automated sample submission are avalailable for selection (see Cloud accounts).
Sequencer folder
Click the Configure button to select the folder that should be monitored for output files generated by the sequencing machine.
Batch folder
This setting is used to determine the batch ID for the submitted samples. Click the Configure button and select a folder from a previous sequencing run that contains the batch ID in its name. For example, selecting the folder <sequencer folder>/sequencing_run_37 will result in the setting sequencing_run_37. Replace any part of the setting that changes between sequencing runs with a wildcard (*), e.g. sequencing_run_*. When starting automation for the workflow, the name of the corresponding folder for a detected sequencing run will be used as the batch ID for the submitted samples (e.g. sequencing_run_38).
Workflow matcher
A single sequencing run might produce multiple samples that should be submitted to different analysis workflows. In order to link samples to workflows, sample filenames must contain a unique ID that can be used to match them with the workflows to which they should be submitted.
To configure the workflow matcher setting, click the Configure button and select a sample file from a previous sequencing run that contains the unique ID representing this workflow in its filename, for example:
<sequencer folder>/sequencing_run_37/Analysis_1/20231007_084249/Logs_Intermediates/FastqGeneration/Fastqs/NA12878-DEMO-WF_S1_L001_R1_001.fastq.gz
Replace any part of the resulting setting that changes between sequencing runs with a wildcard (*), and also replace the parts of the name of the sample file that does not form the unique ID, for example:
sequencing_run_*/Analysis_*/*_*/Logs_Intermediates/FastqGeneration/Fastqs/*-DEMO-WF_*
In the example above, any sample files located in the Fastqs folder of future sequencing runs containing -DEMO-WF_ in the filename will be submitted to this workflow for analysis.
Sample completion
See Definition of sample completion for information about sample completion.
If using the recommended trigger-file sample completion approach, this setting can be configured by clicking the Configure button and selecting a trigger-file from a previous sequencing run, for example:
<sequencer folder>/sequencing_run_37/Analysis_1/20231007_084249/TriggerFile.txt
Replace any part of the resulting setting that changes between sequencing runs with a wildcard (*), for example:
sequencing_run_*/Analysis_*/*_*/TriggerFile.txt
If the sequencing machine does not produce a file that is consistently created after all sample files have been fully written to the output folder, it is possible to use a different file created by the sequencer and adding a delay in minutes between when the file is detected and when the connector should start searching for related sample files. The provided value should be long enough for the sequencer to complete writing all sample files to the output folder before the end of the delay.
If files-per-sample detection is used instead of trigger-file detection, the sample completion setting should be configured by defining the number of files the sequencer produces per sample.
Sample sheet
Optional if the analysis workflow does not require a sample sheet. See Definition of sample grouping for information about sample sheet grouping.
Click the Configure button and select a sample sheet from a previous sequencing run, for example:
<sequencer folder>/sequencing_run_37/Analysis_1/20231007_084249/Logs_Intermediates/FastqGeneration/SampleSheet.csv
Replace any part of the resulting setting that changes between sequencing runs with a wildcard (*), for example:
sequencing_run_*/Analysis_*/*_*/Logs_Intermediates/FastqGeneration/SampleSheet.csv
Submit to QCI Interpret
Check this box if the analysis results should be automatically submitted to QCI Interpret once a sample analysis completes. If you want to inspect the analysis results before submission to QCI Interpret, you can leave this setting disabled and submit the results manually after inspection (see Submitting results to QCI Interpret).
Download results
Check this box if the analysis results should be automatically downloaded once a sample analysis completes. The download location, a file type filter, and the creation of a download completion file can be configured in the download settings dialog (see Download settings).
Export results to cloud
Check this box if the analysis results should be automatically exported to cloud storage once a sample analysis completes. The export location, a file type filter, and the creation of an export completion file can be configured in the export settings dialog (see Cloud export settings).
Testing automation settings
Before saving the configured automation settings, it is recommended to:
- Ensure that wildcards (*) have been added where necessary in the provided settings. If some of the wildcards are missing (e.g. if a timestamp has not been replaced with a wildcard), samples produced by future sequencing runs will not be detected and submitted for analysis.
- Test the settings by clicking the
Test settingsbutton and selecting an existing sequencing run folder. This will open a dialog displaying all the samples in the selected sequencing run that matches the configured automation settings.
After saving the automation settings, automation for the workflow can be started as described in Starting and stopping automation.