Running workflows in the cloud
To run workflows on the CLC Genomics Cloud Engine, select "CLC Genomics Cloud Engine" in the first wizard step when launching a workflow (figure 6.1).
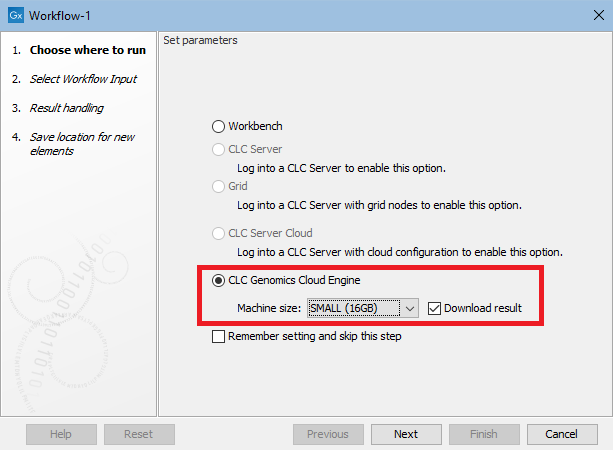
Figure 6.10: Select "CLC Genomics Cloud Engine" to run a workflow in the cloud.
Machine size and downloading results
Select the desired machine size in the drop-down menu. The available options can be configured by the administrator of the CLC Genomics Cloud Engine.
When running small workflows where you wish to download all the workflow results, keep the Download result checkbox checked. For other situations, we recommend this option is not selected. The CLC Workbench must be left running until the workflow completes for the results to be downloaded automatically. Workflow results can be downloaded later using the Cloud Job Search functionality, described in Cloud Job Search.
Data inputs and outputs
The following data sources are available when launching a workflow to run on the CLC Genomics Cloud Engine:
- Data already imported into a CLC location Choose "Select from Navigation Area". The selected data will be uploaded to the AWS S3 cache bucket configured in the GCE settings, described in Configuring the cloud connection. If a given data element is already present in the cache bucket, as determined by the CLC URL of the data element and the time of its latest modification, then it will not be uploaded.
- Locally available data to be imported on the fly when the workflow is run Choose "Select files for import", click "Browse" and select "File system" from the drop-down menu. The data will be uploaded to the AWS S3 cache bucket. If a file is already present in the cache bucket, as determined by the full path of the file and the time of its latest modification, then it will not be uploaded.
- Data in the cloud, to be imported on the fly when running the workflow in the cloud Choose "Select files for import", click "Browse", and select a cloud-based location from the drop-down menu. The analysis will be carried out directly on the data in the cloud, and will not be transferred to the CLC Workbench.
In the "Output location in Amazon S3" wizard step, you specify an output bucket and folder in Amazon S3 to save the workflow results to. Note that workflow results will always be saved in Amazon S3, even if the "Download result" option was checked in the first wizard step. Information about data to be uploaded is also displayed here, as shown in figure 6.2. Any data already present in the cloud cache will not be uploaded.
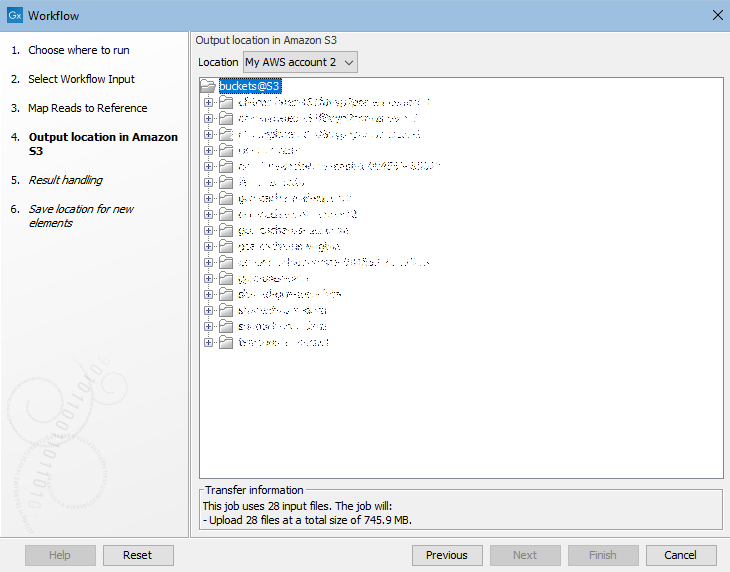
Figure 6.11: Specifying a location for saving workflow results to in Amazon S3. Information about data to be uploaded when the workflow is launched is provided near the bottom of this wizard step.
In the last wizard step, a local location must be selected for workflow outputs, even if the "Download result" checkbox was not checked in the first configuration step. This location is used to save log files to in some circumstances, for example, if a workflow run fails for particular reasons.
Following the progress of workflow jobs run on the cloud
Each workflow submitted to the cloud is submitted as a batch consisting of jobs. A batch may consist of just a single job. Multiple jobs are included in a batch when:
- The "Batch" checkbox is selected in the workflow wizard, and/or
- The workflow design includes control flow elements, as described in the CLC Genomics Workbench manual: http://resources.qiagenbioinformatics.com/manuals/clcgenomicsworkbench/current/index.php?manual=Advanced_workflow_batching.html.
Each job within a batch is executed as a separate job in the cloud, potentially in parallel on separate server instances.
You can follow the progress of the workflow in the Processes area of the CLC Workbench (figure 6.3). The icon next to the process indicates the status of the job submission:
-
 This icon indicates that data is being transferred to the cloud. When this icon is displayed, do not interrupt the connection to the cloud, e.g. do not disconnect from the cloud or shut down your computer.
-
 This icon indicates the job submission is complete, including any data transfer. When this icon is displayed, you can safely disconnect from the cloud, and shut down your computer if you wish.

Figure 6.12: The icon next to the cloud process in the Processes area indicates the submission of this job, including data transfer, is complete.
When the job submission is complete, right-clicking the arrow next to a process and selecting "Show in Cloud Job Search" will open the batch in the Cloud Job Search (figure 6.4). See Cloud Job Search for further details.
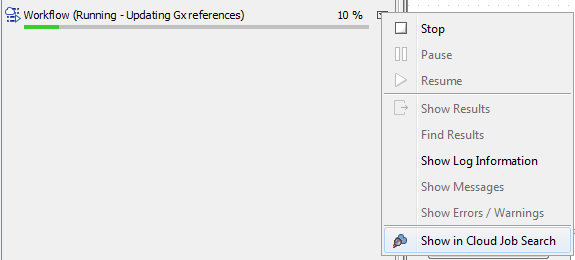
Figure 6.13: You can open an individual job in the Cloud Job Search tool by right-clicking on the arrow next to a process in the Processes area. This option is only available when the job submission to the cloud is complete, including any data transfer.