Running workflows in batch mode
Running batched analyses occurs when:
- The Batch checkbox at the bottom of input steps in the launch wizard has been checked, and/or
- The workflow contains one or more Iterate control flow elements. Steps downstream of Iterate elements and upstream of Collect and Distribute elements, if present, are run once for each batch unit.
When running batches of analyses, the grouping of the data into batch units must be defined after the inputs have been selected.
Defining batch units based on the organization of the input data
For simple workflows, the data to be analyzed together can be defined by its organization. This is identical to defining batch units when launching a tool, as described in Running the analysis and organizing the results.
Here "simple workflows" means workflows with just one analysis input that changes per batch, for example, the sets of sequencing reads to be mapped, where the same reference sequence is used for every mapping.
Defining batch units based on metadata
For more complex scenarios, such as when more than one workflow input uses different data in each batch run, or where part of the workflow is run multiple times, and other parts run just once, batch units must be defined using metadata. Metadata can also be used to define batch units for simple workflows.
There are two ways metadata can be provided:
- Select a CLC Metadata Table as the metadata source. The data elements selected from the Navigation Area as inputs must already have associations to this CLC Metadata Table.
If a CLC Metadata Table with data associated to it has been selected in the "Select Workflow Input" step of a workflow, that table will be pre-selected in the "Configure batching" step of the launch wizard. You can specify the column that batch units will be based on. Data associated with the table rows for each unique value in that column make up the contents of the batch units. The contents can be refined using the fields below the preview pane (figure 11.39).
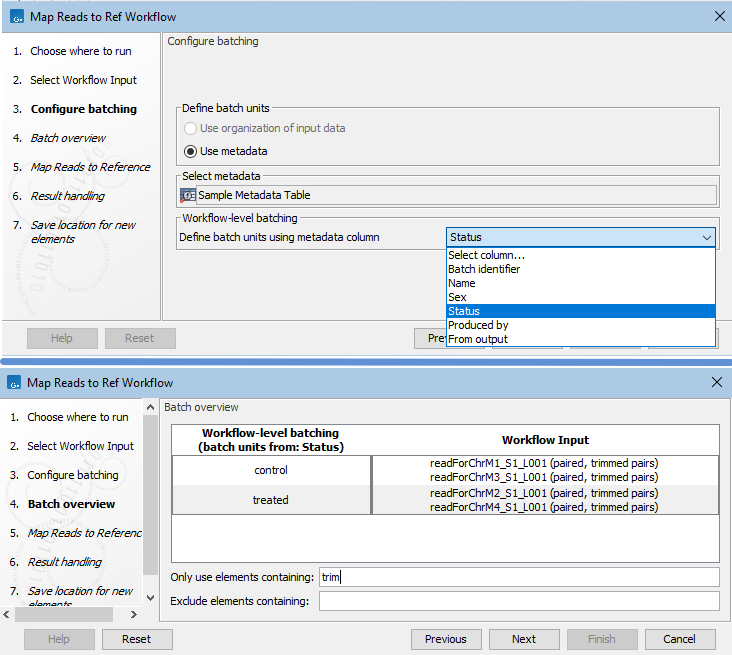
Figure 11.39: A CLC Metadata Table with data associated to it was selected as input to a workflow being launched in Batch mode. In the Configure batching wizard step, the metadata source is pre-configured. The column to base batch units on can be selected (top). The Batch overview step shows the data elements in each batch unit. Here "trim" has been entered in the "Only use elements containing" field, so only elements containing the term "trim" in their names are included in the batch units (bottom). - Select an Excel, CSV or TSV format file as the source. The metadata in that file is imported into the CLC software at the start of the workflow run.
The first column must contain either the exact names of the data selected or a unique prefix, that is, at least enough of the first part of the name to identify each data item uniquely (figure 11.40).
If data is being imported on the fly, the full file name can include file extensions, but not the path to the data.
The top row of the file must contain column headers.
For example, if a data element selected in the Navigation Area has the name
atp8a_1_sample1_day3, then the first column could contain that name in full, or just enough of the first part of the name to uniquely identify it. This could be, for example,atp8a_1_sample1. Similarly, if a data file selected for on-the-fly import is at:C:\Users\username\My Data\atp8a_1 sample1_day3.clc, the first column of the Excel spreadsheet could containatp8a_1_sample1_day3.clc, or a prefix long enough to uniquely identify the file, e.g.atp8a_1_sample1.
Example: On-the-fly import of single end reads based on metadata
In figure 11.40, a workflow with a single input is being launched in batch mode. The eight files selected contain Illumina single end reads. This raw data will be imported on the fly using metadata to define the batch units. The metadata column in the Excel file that contains information defining the batch units has been specified. Here, files with the same value in the SRR_ID column will be imported and analyzed together.
Each row in the SRR_ID column has a unique entry, so 8 batch units will be made, with one sequence file in each batch unit. If a column containing fewer unique values was selected, one or more batch units would consist of several files. This is illustrated in figure 11.40.
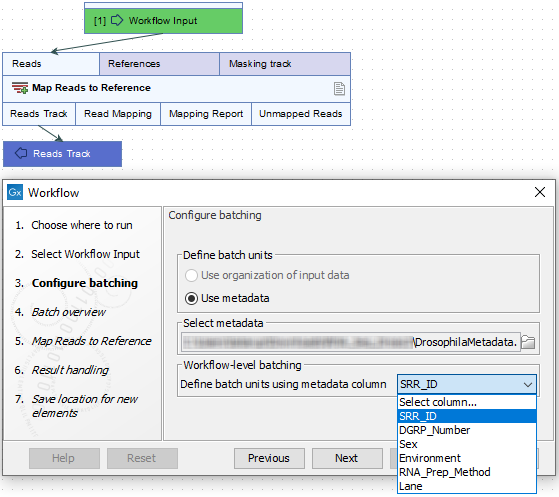
Figure 11.40: Batch units are defined according to the values in the SRR_ID column of the Excel file that was selected.
In the next step, a preview of the batch units is shown. The workflow will be run once for each entry in the left hand column, with the input data grouped as shown in the right hand column (figure 11.41).
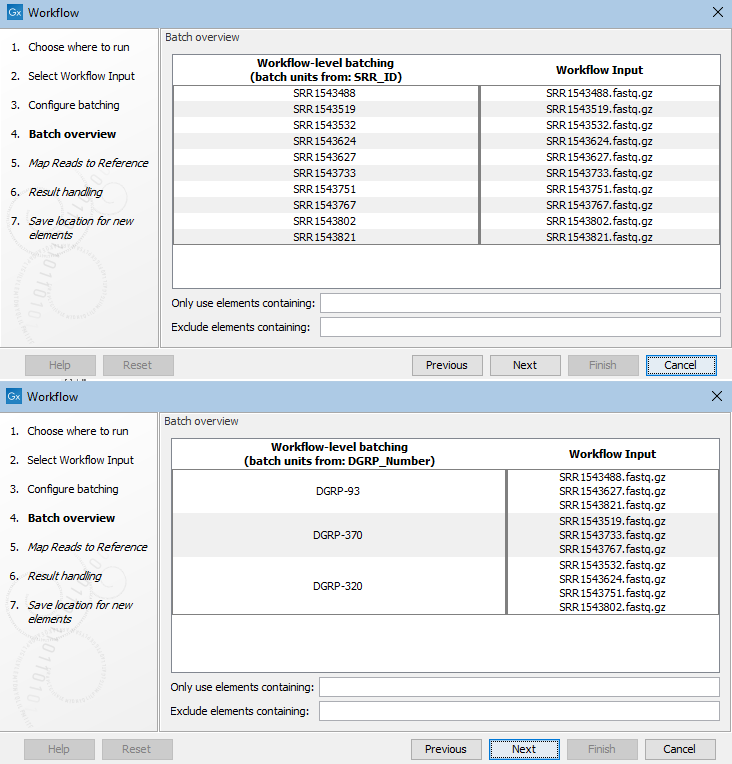
Figure 11.41: The Batch overview step allows you to review the batch units. In the top image, a column called SRR_ID had been selected, resulting in 8 batch units, so 8 workflow runs, with the data from one input file to be used in each batch. In the lower image, a different column was selected to define the batch units. There, the workflow would be run 3 times with the input data grouped as shown.
Example: On-the-fly import of paired end reads based on metadata
When importing data on-the-fly and organizing batch units based on metadata, the metadata must have a row per file being imported. For paired data, this means at least 2 rows per sample. One column in the file must contain information about which files belong together. This allows the sequence list created to be associated with the relevant information.
The contents of an Excel file with information about 2 sets of paired files containing Sanger data are shown in figure 11.42.
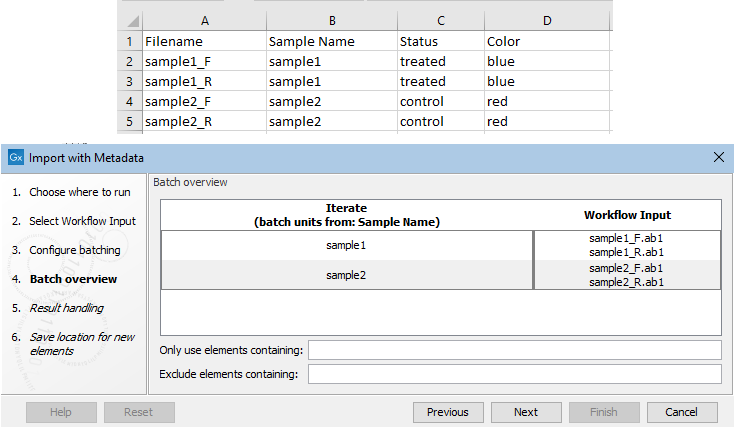
Figure 11.42: An Excel file at the top describes 4 Sanger files that make up two pairs of reads. The "Sample Name" column was identified as the one indicating the group the file belongs to. Information about the relevant sample appears in each row. At the Batch overview step, shown at the bottom, you can check the batch units are as intended.
Each row for data that is in the same batch unit must contain the same descriptive information. Where there is conflicting information for a given batch unit, the value for that column will be ignored. If all entries for a given column are conflicting, the column will not appear in the resulting CLC Metadata Table.
Saving results from workflows run in batch mode
When a workflow is run in batch mode, options are presented in the last step of the wizard for specifying where to save results of individual batches (see Running the analysis and organizing the results).
If the workflow contains Export elements, an additional option is presented, Export to separate directories per batch unit (figure 11.43). When that option is checked, files exported are placed into separate subfolders under the the export folder selected for each export step.
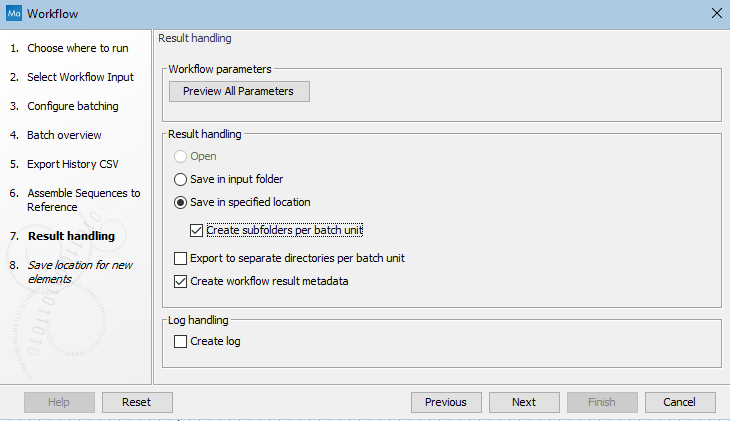
Figure 11.43: Options are presented in the final wizard step for configuring where outputs and exported files from each batch run should be saved.
