Realignment
This section describes realigning parts of an existing alignment. To realign an entire alignment, consider using the "Redo alignment" option of the Create Alignment tool, described in Aligning alignments
Examples where realigning part of an alignment can be helpful include:
- Adjusting the number of gaps If a region has more gaps than is useful, select the region of interest and realign using a higher gap cost.
- Combine with fixpoints When you have an alignment where two residues are not aligned although they should have been, you can set an alignment fixpoint on each of those residues. and then realign the section of interest using those fixpoints, as described in Fixpoints. This should result in the two residues being aligned, and everything in the selected region around them being adjusted to accommodate that change.
Realigning a subsection of an alignment
There are two steps to realigning a subsection of an alignment:
- Select the region of interest.
- Realign the selected region.
Selecting a region
Click and drag to select the regions of interest. For small regions in a small number of sequences, this may be easiest while zoomed in fully, such that each residue is visible. For realigning entire sequences, zooming out fully may be helpful.
As selection involves clicking and dragging the mouse, all regions of interest must be contiguous. That is, you must be able to drag over the relevant regions in a single motion. This may mean gathering particular sequences into a block. There are two ways to achieve this:
- Click on the name of an individual sequence and drag it to the desired location in the alignment. Do this with each relevant sequence until all those of interest are placed as desired.
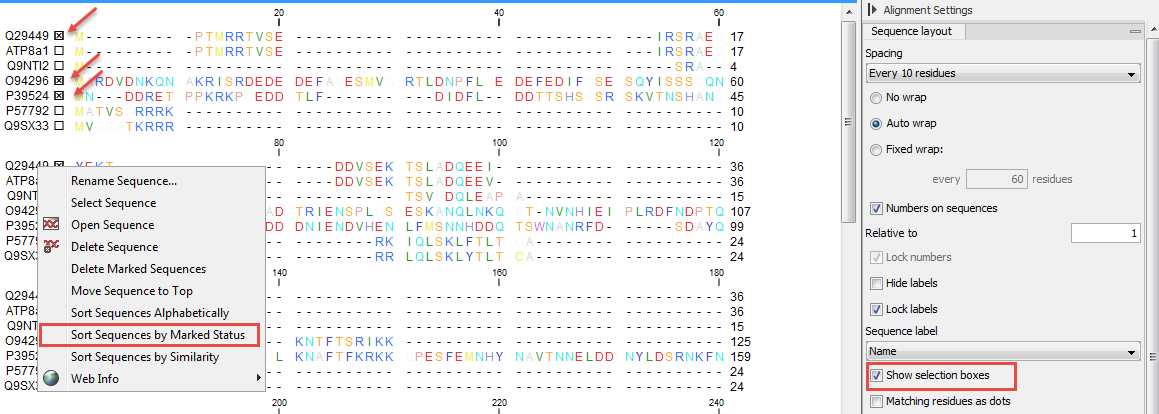
- Check the option "Show selection boxes" in the Alignment settings section of the side panel settings (figure 14.10). Click in the checkbox next to the names of the sequences you wish to select. Then right-click on the name of one of the sequences and choose the option "Sort Sequences by Marked Status". This will bring all selected sequences to the top of the alignment.
If you have many sequences to select, it can be easiest to select the few that are not of interest, and then invert the selection by right-clicking on any of the checkboxes and choosing the option "Invert All Marks".

Figure 14.12: Marking and sorting sequences by marked status in an alignment
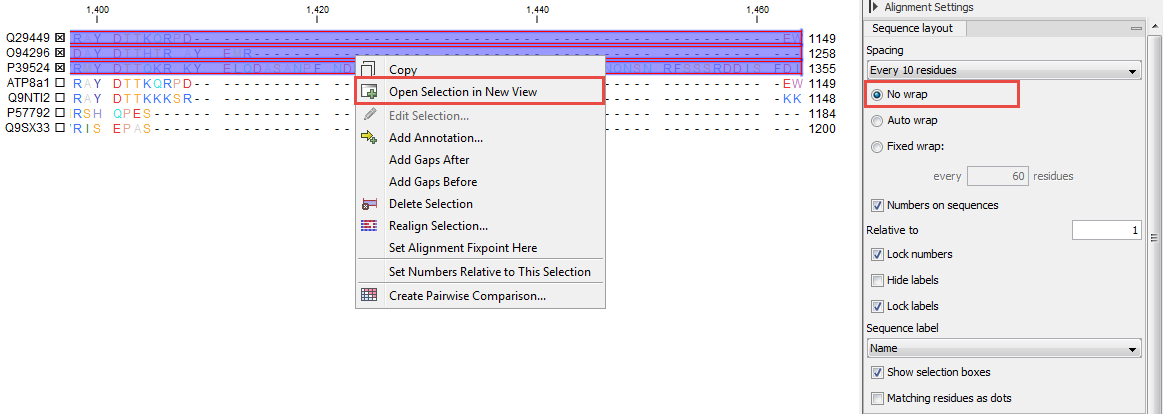
You can then easily click-and-drag your selection of sequences (this is made easier if you select the "No wrap" setting in the right-hand side panel). By right-clicking on the selected sequences (not on their names, but on the sequences themselves as seen in figure 14.11), you can choose the option "Open selection in a new view", with the ability to run any relevant tool on that sub-alignment.

Figure 14.13: Open the selected sequences in a new window to realign them.
Realign the selected region
To realign the selected region:
Right-click the selection | Choose the option "Realign selection"
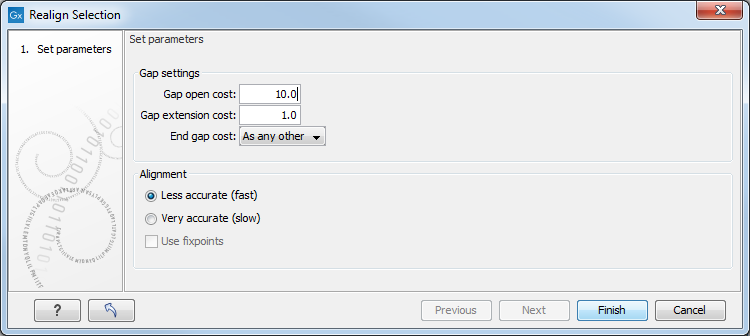
This will open a window allowing you to set the parameters for the realignment (see figure 14.12).

Figure 14.14: Options available when realigning a subset of an alignment.
It is possible for an alignment to become shorter or longer as a result of the realignment of a region. This is because gaps may have to be inserted in, or deleted from, the sequences not selected for realignment. This will only occur for entire columns of gaps in these sequences, ensuring that their relative alignment is unchanged.
Learn more about the options available to you in the sections Gap Costs and Fast or accurate alignment algorithm.
