Use Genome as Result
The Use Genome as Result tool is part of the Map to Specified Reference workflow scenario and is not necessarily intended to be used as a single tool by users. Its function, at the last step of the Map to Specified Reference workflow, is double: it adds the name of the reference genome used for the re-mapping to the 'role' of the input files (for example the role "mapping report" will become "NC_011083 mapping report", where NC_011083 is the name of the reference used to re-map). It also creates an extra column in the Result Metadata Table whose header is the name of the common reference that was used for the re-mapping (here NC_011083). This extra column makes it possible to distinguish between read mappings that were generated at different time points as well as in different runs of the workflow, despite using the same genome reference.
To run the Use Genome as Result tool although it is not intended to be used as a single tool by users, go to:
Toolbox | Microbial Genomics Module (![]() ) | Typing and Epidemiology (beta) (
) | Typing and Epidemiology (beta) (![]() ) | Result Metadata (
) | Result Metadata (![]() ) | Use Genome as Result (
) | Use Genome as Result (![]() )
)
The the tool can take multiple elements as input, thet will have their metadata role changed to include the name of reference sequence in addition to the original role value. Relevant elements can be selected individually, or you can select folders by right-clicking on the folder value and selecting Add folder contents (it will select all elements in that folder), or select folder recursively by right-clicking on the folder value and selecting Add folder contents (recursively). In this last case all elements of the folder, including elements contained in subfolders, will be selected (see figure 8.15). Click next Next.
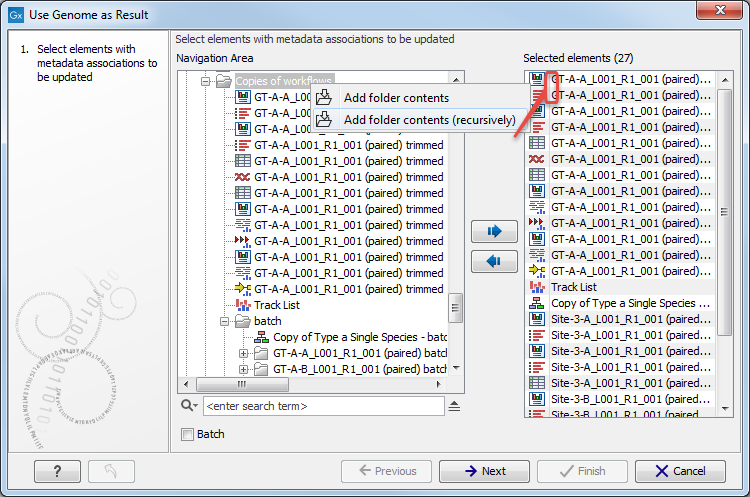
Figure 8.15: Select recursively elements with metadata associations to be updated. Here the selected elements are the 16 of the folder 'Copies of workflows' as well as the 9 from the subfolder called 'batch'.
Select the relevant read mapping, i.e., the read mapping that was created using the common reference you want to annotate the roles with (figure 8.16).
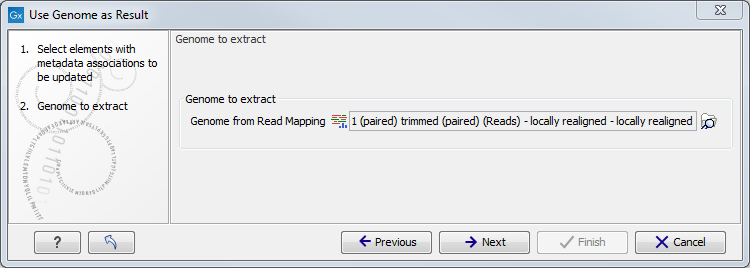
Figure 8.16: Specification of the read mapping to be associated with genome metadata.
In addition to changing the role name, the tool creates a new column named after the selected reference sequence in the Result Metadata Table. This column indicates whether data has been analysed using this reference or not (For an example see column "NC_011083" in figure 8.17). To filter for all possible elements that were generated using this sequence as reference data, open the filter banner by clicking on the icon (![]() ) next to the Filter button. In the first drop down menu, choose the column whose header is the reference sequence of interest. In the second drop down menu, choose the term "contains", and in the third window, write "true". This will filter for all the elements with a tick in the reference sequence column, as can be seen on the figure 8.17.
) next to the Filter button. In the first drop down menu, choose the column whose header is the reference sequence of interest. In the second drop down menu, choose the term "contains", and in the third window, write "true". This will filter for all the elements with a tick in the reference sequence column, as can be seen on the figure 8.17.
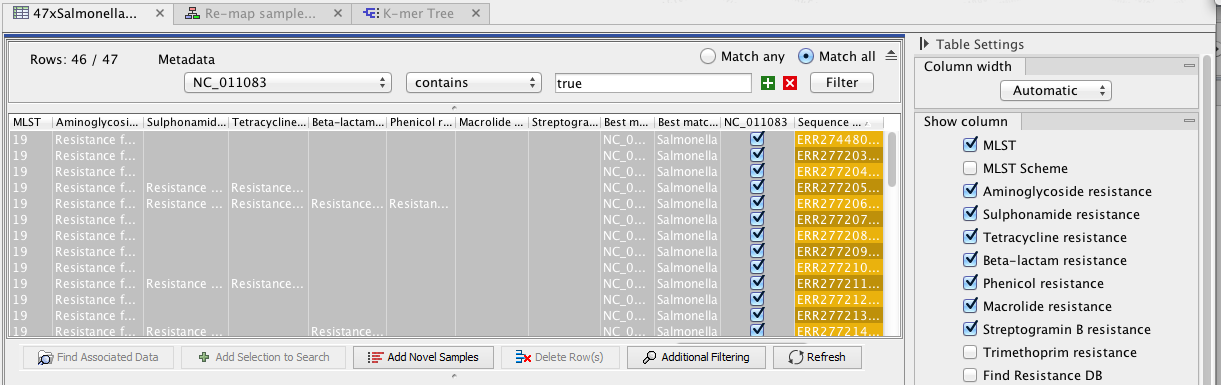
Figure 8.17: Filter for elements who share a tick in the column newly generated by the Use Genome as Result tool