Configuring the Cloud Server Plugin
To support submission of workflows to GCE via a CLC Server, take the steps detailed below in the CLC Server web administrative interface. You will need details about your GCE setup from your GCE administrator to complete these steps.
- Configure S3 locations under the External data tab, in the Configuration area. Provide AWS credentials that allow access to a GCE cache bucket. Multiple AWS accounts can be configured, if desired.
- Under Direct data transfer from clients, also under the External data tab, ensure direct data transfer from client systems is allowed. If you have not already done so, you will need to configure an Import/export directory for this.
- Install the Cloud Server Plugin and restart the CLC Server.
- Configure the Cloud Server Plugin settings (described below).
- Configure GCE presets. These reflect the presets defined by the GCE administrator, which include information like machine size, and are specified when submitting jobs from client software. (Configuring GCE presets).
Related manual pages in the CLC Genomics Server administration manual:
- Configuring AWS S3 locations:
https://resources.qiagenbioinformatics.com/manuals/clcserver/current/admin/index.php?manual=Other_external_data_access.htm
- Installing server plugins: https://resources.qiagenbioinformatics.com/manuals/clcserver/current/admin/index.php?manual=Server_plugins.html.
- Direct data transfer from client systems: https://resources.qiagenbioinformatics.com/manuals/clcserver/current/admin/index.php?manual=Direct_data_transfer_from_client_systems.htmll
- Setting up import/export directories: https://resources.qiagenbioinformatics.com/manuals/clcserver/current/admin/index.php?manual=Accessing_files_on_writing_to_areas_server_filesystem.html
Configuring Cloud Plugin settings in the CLC Server
- Navigate to the Extensions tab in the CLC Server web administrative interface and click on the Edit GCE connection settings button.
- Click on the Edit button next to Cloud Plugin in the window that appears (figure 7.1).
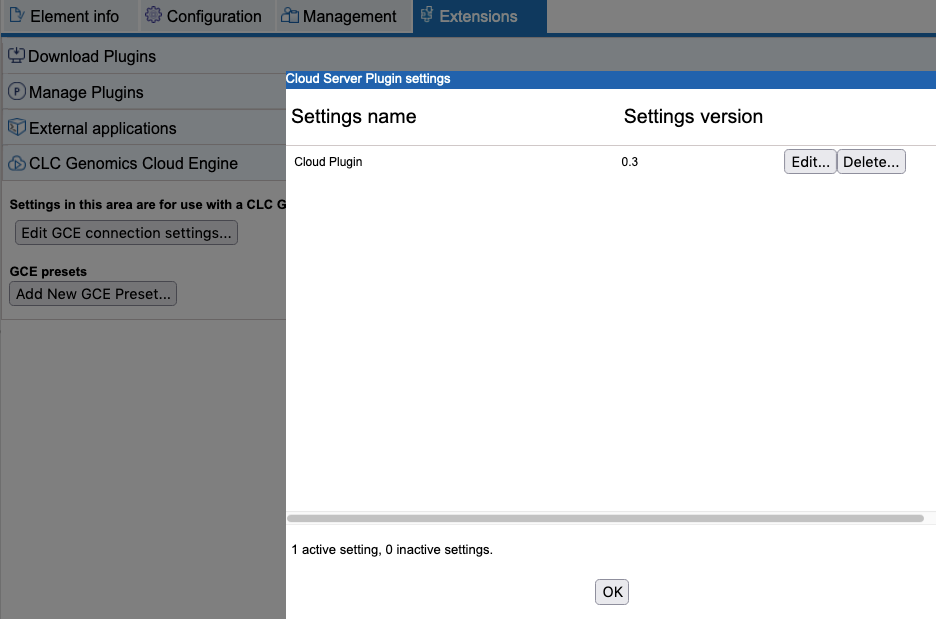
Figure 7.1: The GCE connection settings can be configured after clicking on the Edit button for the Cloud Plugin.The settings to configure (figure 7.2) are listed below. Your GCE administrator should provide you with the necessary information. Brief notes are included to help finding the relevant information on AWS when logged into the account used to set up GCE. AWS frequently change aspects of their console, so details may vary from those described.
- GCE S3 cloud cache bucket name: The name of GCE cache bucket.
GCE cache buckets are usually set up at the time when GCE was installed. An S3 bucket not configured as a GCE cache bucket should not be specified here.
An error message is shown if the specified cannot be found. This could happen if, for example, credentials giving access to the relevant S3 location has not already been configured in the CLC Server, or the named bucket could not be found in an AWS account that has been configured.
- GCE job mananger rest host URI: The URL for the GCE service.
In the AWS Console, navigate to the Elastic Beanstalk Service. The URL is listed in the row for the Job Manager environment. Prepend this with the "https://" protocol when filling in this field.
- GCE http oauth2 client id: The client ID used by the CLC Genomics Server to authenticate using OAuth2 Client Credentials Grant.
To get the client id, go to the Cognito service in the AWS Console, select the relevant Cognito user pool, and click on the "App Client" option. Find the "QIAGEN CLC Genomics Server" in the "App clients and applications section". Click on that app client. The value needed is under "Client ID".
- GCE http oauth2 client secret: The client secret used by the CLC Genomics Server to authenticate using OAuth2 Client Credentials Grant.
See the notes in the point above for where to navigate to in the AWS Console. The information needed is under "Client secret". Enable "Show client secret" to reveal it.
- GCE http oauth2 authorization server: The access token endpoint of the authentication server used by the CLC Genomics Cloud Engine.
In your Cognito user pool area in the AWS Console, click on the "Domain name" tab under "App integration". The base of the URL needed is provided under "Cognito domain." Append
/oauth2/tokento this. E.g. if the base URL was
https://gce.auth.eu-north-1-amazoncognito.com,
enter the following into this field:
https://gce.auth.eu-north-1.amazoncognito.com/oauth2/token - Accept untrusted certificate: Usually, production systems will have a trusted certificate, and this box is left unchecked. Check this box if the GCE service has been set up with a self-signed certificate.
- Validate settings: This option, enabled by default, validates the AWS and GCE settings when you press OK. Uncheck this box only if you need to temporarily store invalid settings.
- GLOBAL_OVERRIDABLE: This setting has no effect for the Cloud Server Plugin and we recommend leaving it at the default settings.
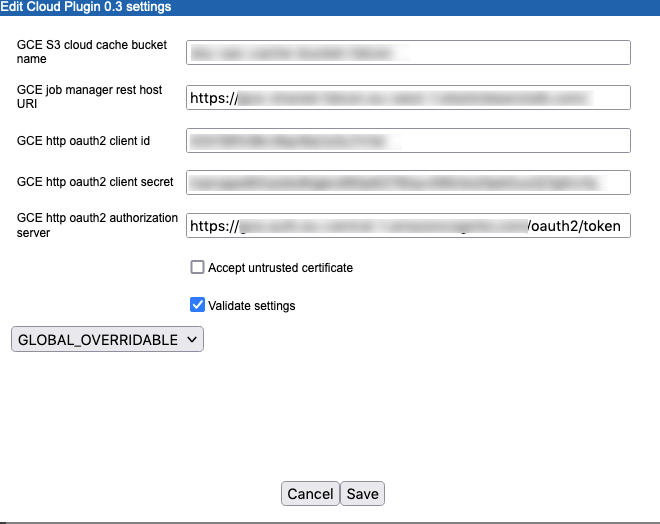
Figure 7.2: Configuration of the Cloud Server Plugin settings
- GCE S3 cloud cache bucket name: The name of GCE cache bucket.
- One or more GCE presets should now be configured, as described in Configuring GCE presets.