Running workflows on a CLC Genomics Cloud Engine
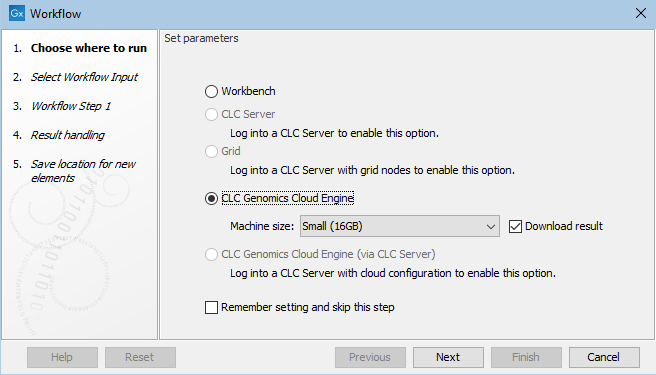
To launch workflows on a CLC Genomics Cloud Engine, select a "CLC Genomics Cloud Engine" option in the first wizard step (figure 5.1).
Selecting "CLC Genomics Cloud Engine" will submit the workflow via your CLC Workbench. Selecting "CLC Genomics Cloud Engine (via CLC Server)" will submit the workflow via a CLC Server. This option is only available to select if you are connected to a CLC Genomics Server with the Cloud Server Plugin installed and configured. See Cloud connections via a CLC Server for details.

Figure 5.1: Select "CLC Genomics Cloud Engine" to submit a workflow the CLC Genomics Cloud Engine via your Workbench.
Machine size and downloading results
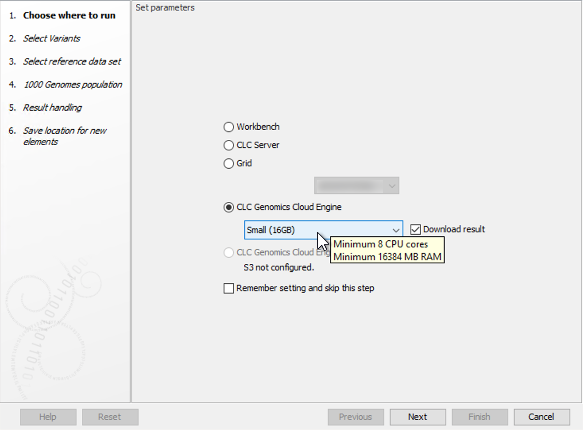
Select the desired machine size in the drop-down menu (figure 5.2). The available options can be configured by your GCE administrator. Typically, the larger the machine, the greater the cost, although a job's duration will also affect costs.
When running small workflows where you wish to download all the workflow results, keep the Download result checkbox checked. For other situations, we recommend this option is not selected. The CLC Workbench must be left running until the workflow completes for the results to be downloaded automatically. Workflow results can be downloaded later using the Cloud Job Search functionality, described in Cloud Job Search.

Figure 5.2: Select a machine size that reflects the requirements of the worfklow being run. Hover the mouse cursor over a selected size to see more details.
Handling input data
When launching a workflow, the data to be analyzed can be selected from the Navigation Area or from an external location. When files from an external location are chosen, they will be imported on the fly, that is, the first step in the workflow execution on GCE will be to import the data. On-the-fly import is described in more detail ni the CLC Workbench manuals: https://resources.qiagenbioinformatics.com/manuals/clcgenomicsworkbench/current/index.php?manual=Importing_data_on_fly.html
How data is made accessible to GCE depends on where it is located when launching the workflow. This is described in Data location considerations.
QIAGEN reference data in workflows
Reference data provided by QIAGEN is already available on AWS in every region that GCE is supported in. This means that when these data elements are selected when launching a workflow, no data transfer occurs.
When all parameters that take reference data elements are locked, and all data referred to are QIAGEN Reference Data Elements, then the workflow can be launched to run on GCE from a CLC Genomics Workbench without downloading the data locally. The exception is where multiple data elements can be selected for a single parameter. In this case, the data must be present locally to be able to submit the workflow.
If any parameter for reference data in a workflow is unlocked, then the reference data elements referred to must be present locally to send the job to GCE.
Note: When submitting such workflows to GCE via a CLC Server, the data must be present in the CLC Server CLC_References area, even though a copy of that data already in the cloud is actually used.
See also Data location considerations for information about data location considerations relating to reference data.
Result handling
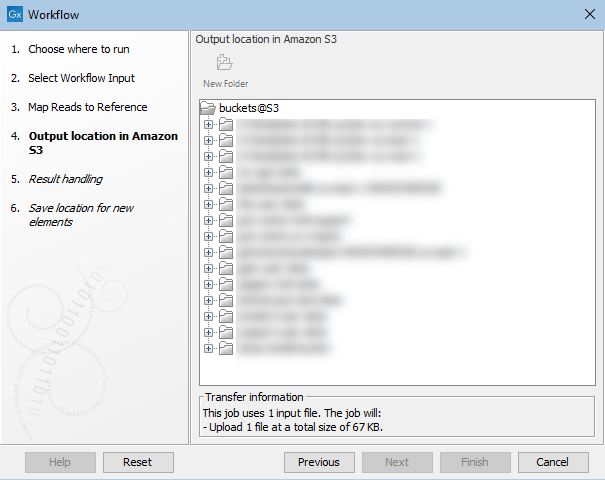
In the "Output location in Amazon S3" wizard step, you specify where to save the workflow results to. If you have configured more than one S3 location, you will be offered a choice of locations. Information about data to be uploaded is also displayed here, as shown in figure 5.3. Any data already present in the cloud cache will not be uploaded.
Results are always saved to Amazon S3, whether or not the "Download result" option is checked in the first wizard step when launching the workflow.

Figure 5.3: Specifying a location for saving workflow results to in Amazon S3. Information about data to be uploaded when the workflow is launched is provided near the bottom of this wizard step.
In the last wizard step, a local location must be selected for workflow outputs. If the "Download result" checkbox was not checked in the first configuration step, this location is still needed as log files are saved here in some circumstances, for example, if the workflow fails for particular reasons.
Following the progress of workflow jobs run on the cloud
Each workflow submitted to the cloud is submitted as a batch consisting of jobs. A batch may consist of just a single job. Multiple jobs are included in a batch when:
- The "Batch" checkbox is selected in the workflow wizard, and/or
- The workflow design includes control flow elements, as described in the CLC Genomics Workbench manual: http://resources.qiagenbioinformatics.com/manuals/clcgenomicsworkbench/current/index.php?manual=Advanced_workflow_batching.html.
Each job within a batch is executed as a separate job in the cloud, potentially in parallel on separate server instances.
You can follow the progress of the workflow in the Processes area of the CLC Workbench (figure 5.4). The icon next to the process indicates the status of the job submission:
-
 This icon indicates that data is being transferred to the cloud. When this icon is displayed, do not interrupt the connection to the cloud, e.g. do not disconnect from the cloud or shut down your computer.
-
 This icon indicates that the job submission is complete, including any data transfer. When this icon is displayed, you can safely disconnect from the cloud, and shut down your computer if you wish.

Figure 5.4: The icon next to the cloud process in the Processes area indicates the submission of this job, including data transfer, is complete.
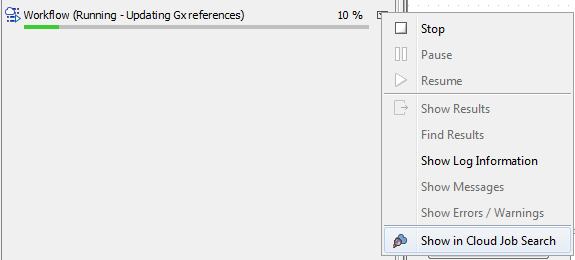
When the job submission is complete, right-clicking the arrow next to a process and selecting "Show in Cloud Job Search" will open the batch in the Cloud Job Search (figure 5.5). See Cloud Job Search for further details.

Figure 5.5: You can open an individual job in the Cloud Job Search tool by right-clicking on the arrow next to a process in the Processes area. This option is only available when the job submission to the cloud is complete, including any data transfer.
