Running the Analyze Count Matrix and Upload Comparisons to IPA Workflow
The workflow can be started from the toolbox, or by using the Launch button (In the first step choose the reference data, if default is selected no elements are configured and you will have to fill in the desired reference elements in the next two steps. Note, that you should be very specific with the chosen reference data that needs to match the genes in the Expression matrix that is imported, otherwise you might lose genes that cannot be matched on import.
Next select the tables file with the expression data and specify what type of count data you provide (raw count, TPM or RPKM are allowed) as well as how they were processed. Finally, select the metadata table. See figure 4.3.
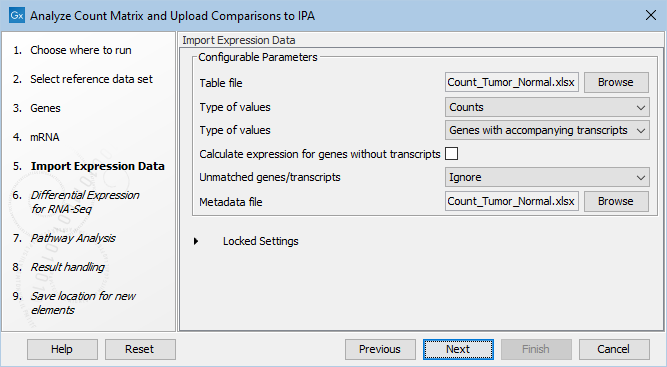
Figure 4.3: Selecting table file to import including specifying type of value (Gene/TPM/RPKM) and Gene/Transcript, as well as choosing the location of the sample metadata file.
Metadata is required for organization of the imported counts and essential to the experimental design in the Differential Expression for RNA-Seq tool. In addition it and can be used to add extra layers of insight in the Create Heat Map and PCA for RNA-Seq tools. To learn more about how to create a metadata table, how to import a metadata table, or how to associate data elements with metadata, see http://resources.qiagenbioinformatics.com/manuals/clcgenomicsworkbench/current/index.php?manual=Metadata.html.
Following this, the parameters for the Differential Expression for RNA-Seq need to be specified, see figure 4.4.
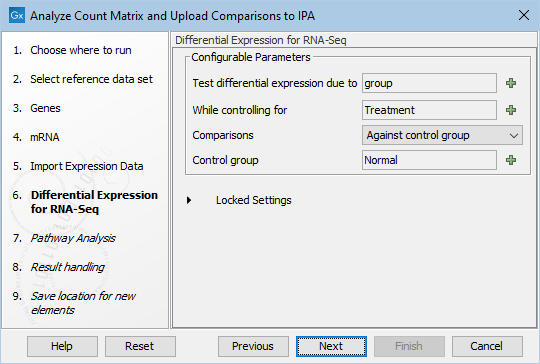
Figure 4.4: Set up the Differential Expression analysis by selecting metadata and choosing parameters.
Specify the following
- Test differential expression due to
- Select the factor to be tested for differential expression.
- while controlling for
- Select the factor to be controlled for.
- Comparisons
- Select groups to be compared. It is possible to choose between "Across groups", "All group pairs", and "Against control group".
- Control group
- If "Against control group" was selected in "Comparisons", a control group must be selected.
In the next step, the parameters for the Pathway Analysis tool need to be set. Setting the parameters in a workflow context is not as user-friendly as when run stand-alone, because the parameters from the different pages are grouped on the same page in workflow execution. To help clarify this, it is indicated in figure 4.5 which parameters pertain to the IPA upload, and which pertain to the IPA analysis.

Figure 4.5: Selecting the Pathway Analysis tool parameters for upload to IPA and analysis in IPA.
In the final step, standard result handling is performed: The selected parameters can be previewed, and an output location must be chosen.