Sort sequences by name
With this functionality you will be able to group sequencing reads based on their file name. A typical example would be that you have a list of files named like this:
...
A02__Asp_F_016_2007-01-10
A02__Asp_R_016_2007-01-10
A02__Gln_F_016_2007-01-11
A02__Gln_R_016_2007-01-11
A03__Asp_F_031_2007-01-10
A03__Asp_R_031_2007-01-10
A03__Gln_F_031_2007-01-11
A03__Gln_R_031_2007-01-11
...
In this example, the names have five distinct parts (we take the first name as an example):
- A02 which is the position on the 96-well plate
- Asp which is the name of the gene being sequenced
- F which describes the orientation of the read (forward/reverse)
- 016 which is an ID identifying the sample
- 2007-01-10 which is the date of the sequencing run
To start mapping these data, you probably want to have them divided into groups instead of having all reads in one folder. If, for example, you wish to map each sample separately, or if you wish to map each gene separately, you cannot simply run the mapping on all the sequences in one step.
That is where Sort Sequences by Name comes into play. It will allow you to specify which part of the name should be used to divide the sequences into groups. We will use the example described above to show how it works:
Toolbox | Molecular Biology Tools (![]() ) | Sequencing Data Analysis (
) | Sequencing Data Analysis (![]() ) | Sort Sequences by Name (
) | Sort Sequences by Name (![]() )
)
This opens a dialog where you can add the sequences you wish to sort, by using the arrows to move them between the Navigation Area and 'Selected Elements'. You can also add sequence lists or the contents of an entire folder by right-clicking the folder and choose: Add folder contents.
When you click Next, you will be able to specify the details of how the grouping should be performed. First, you have to choose how each part of the name should be identified. There are three options:
- Simple. This will simply use a designated character to split up the name. You can choose a character from the list:
- Underscore _
- Dash -
- Hash (number sign / pound sign) #
- Pipe |
- Tilde ~
- Dot .
- Positions. You can define a part of the name by entering the start and end positions, e.g. from character number 6 to 14. For this to work, the names have to be of equal lengths.
- Java regular expression. This is an option for advanced users where you can use a special syntax to have total control over the splitting. See more below.
In the example above, it would be sufficient to use a simple split with the underscore _ character, since this is how the different parts of the name are divided.
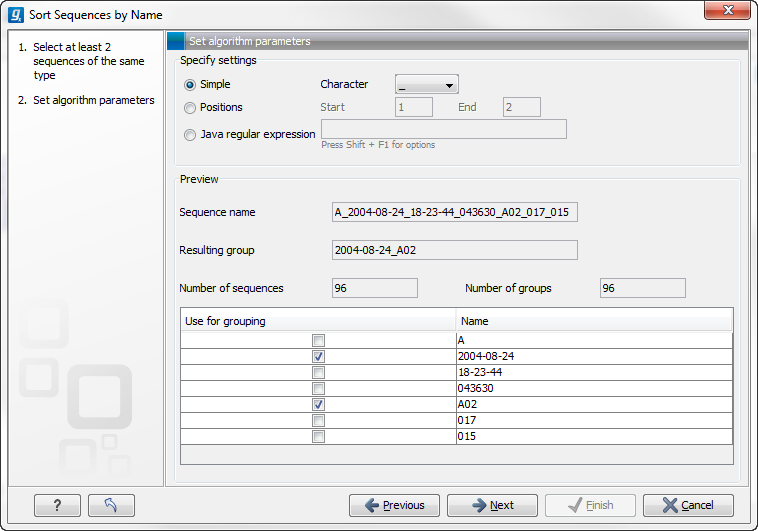
When you have chosen a way to divide the name, the parts of the name will be listed in the table at the bottom of the dialog. There is a checkbox next to each part of the name. This checkbox is used to specify which of the name parts should be used for grouping. In the example above, if we want to group the reads according to date and analysis position, these two parts should be checked as shown in figure 18.7.

Figure 18.7: Splitting up the name at every underscore (_) and using the date and analysis position for grouping.
At the middle of the dialog there is a preview panel listing:
- Sequence name. This is the name of the first sequence that has been chosen. It is shown here in the dialog in order to give you a sample of what the names in the list look like.
- Resulting group. The name of the group that this sequence would belong to if you proceed with the current settings.
- Number of sequences. The number of sequences chosen in the first step.
- Number of groups. The number of groups that would be produced when you proceed with the current settings.
Click Next if you wish to adjust how to
handle the results. If not, click Finish.
A new sequence list will be generated for each group. It will be named according to the group, e.g. 2004-08-24_A02 will be the name of one of the groups in the example shown in figure 18.7.
