The modify panel
The modify panel offers the following operations:

Figure 10.26: The element buttons make it possible to change the element type for an atom, or to add an element to the ligand (this is done by selecting a hydrogen atom and choosing the desired element).
1) Change the element for an existing atom (figure 10.26). To do this select a non-hydrogen atom on the ligand, and click the desired element button from the top row. It is also possible to select more exotic elements using the Other... button. Replacing an element will automatically adjust bond lengths and the number of attached hydrogens. Notice that elements in rings cannot be replaced (rings must be removed and replaced with fragments from a library).
2) Add new elements to the ligand (figure 10.26). This is done by selecting a hydrogen atom, which will serve as the attachment point. After selecting the hydrogen atom, click on an element button to replace the hydrogen atom. As above, bond lengths and hydrogens are automatically adjusted.
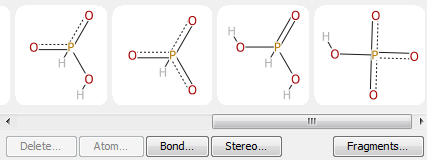
Figure 10.27: Fragments are attached by selecting a hydrogen atom on the ligand, and a hydrogen atom on the fragment. Any Molecule Project may be used as a source for fragments.
3) Attach a new fragment to the ligand (figure 10.27). This works similar to adding a new element, but requires selecting an attachment point on the fragment as well: first select a hydrogen on the ligand, then select a hydrogen on the fragment. The fragment will be attached to the ligand by replacing the selected hydrogens with a covalent bond. As above, bond lengths and hydrogen counts are automatically adjusted. It is also possible to just select a heavy atom with at least one hydrogen attached on the ligand. In this case an arbitrary hydrogen on the heavy atom will be used as the attachment point for the fragment.
It is possible to choose between different fragment libraries using the Fragments... button. Two small libraries are provided with the Ligand Optimizer (one for ring systems, and one for common chemical groups, such as carboxylate and phosphate groups), but it is possible to use molecules from any Molecule Project as fragments. To do this, choose the Fragments... | From Molecule Project... menu entry. Any ligands in the selected Molecule Project will appear as attachable fragments in the Ligand Optimizer. This also makes it possible to attach fragments drawn in a 2D sketcher: simply paste the SMILES string from the 2D sketcher into a Molecule Project (as described in Copy-paste of SMILES strings), and use the Molecule Project as a fragment library.
Fragment modifications are previewed in real-time in the 3D view. After a fragment has been added, the newly attached part of the ligand will be subjected to a quick geometry optimization in order to place the fragments in the most energetically favorable way with regard to the protein context.
4) Delete parts of the ligand
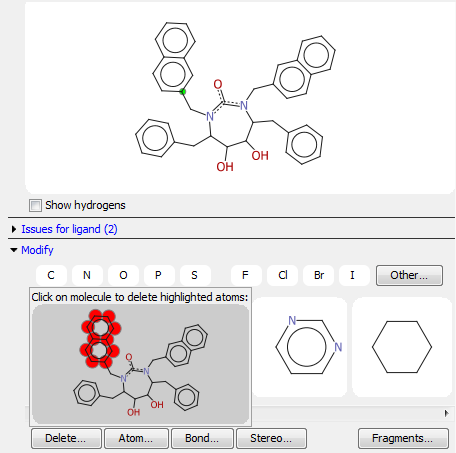
Figure 10.28: Choose an atom, and press the Delete... button in order to remove a part containing the selected atom.
The Delete... button (figure 10.27) makes it possible to delete any part of the molecule containing the selected atom. However, a part can only be deleted if the remaining part of the molecule is still connected, and no rings are broken (whole rings may be deleted though). The atoms connected to removed parts are automatically repaired by adding hydrogens.
5) Change atom type
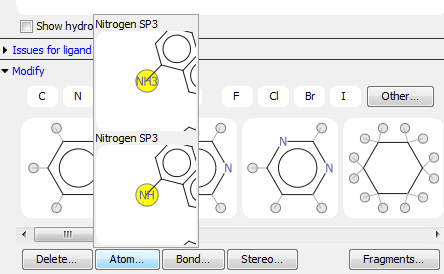
Figure 10.29: Choose an atom and press the Atom... button to change the number of hydrogens or hybridization.
The Atom... button (figure 10.29) makes it possible to change the atom type (the number of hydrogens and formal charges). If the atom type needs to be changed into a different hybridization, it might be necessary to change the bonds connected to it by using the Bond... tool described below.
6) Change bond order
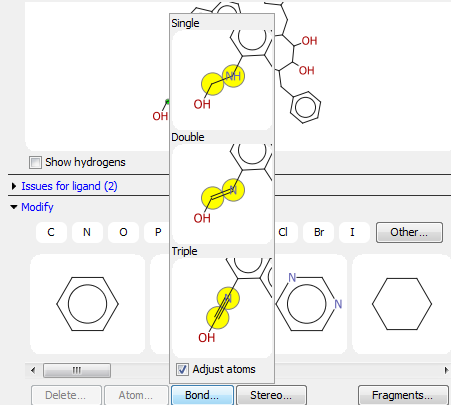
Figure 10.30: Choose two covalently connected atoms and press the Bond... button to change the bond order.
The Bond... button (figure 10.30) makes it possible to change bond orders. Start by choosing two covalently bonded atoms, and press the Bond... button. The different possible bond orders are then shown (e.g. single, double, triple). If the Adjust atoms checkbox is checked, neighboring atoms will automatically have their hybridization and hydrogen count corrected. In cases where the automatic adjustments are unwanted, the Adjust atoms option can be disabled, which makes it possible to change bond order without updating atom hybridizations and geometry even though it might lead to chemistry issues.
7) Change stereochemistry
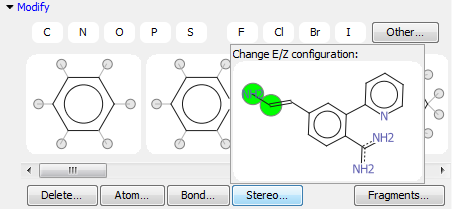
Figure 10.31: press the Stereo... button to change stereo chemistry.
The Stereo... button (figure 10.31) makes it possible to change the stereo chemistry of a ligand. In order to do this, a stereo center must be selected on the ligand. If the selected atom is not a stereo center (or there is no atom currently selected), any valid stereo centers will be automatically shown using cyan overlays on the 2D depiction.
Two types of stereo chemistry changes are possible: E/Z swaps (for SP2 hybridized atoms), where the groups on one side of a double (or delocalized bond) are rotated 180 degrees, and R/S inversions (for SP3 hybridized atoms) where two different groups are swapped. For R/S inversions, we swap the two smallest attached groups. The stereochemistry options are not enabled on atoms with two identically attached groups.