Configuring automation settings
The connector supports automation of the process from sample detection to QCI upload (see Job automation). If automation should be enabled for a workflow, it must be configured by selecting the enabled workflow and clicking the Configure button (note that automation settings cannot be modified while automation is currently running for the selected workflow).
See Automation configuration concept definitions for definitions of concepts used when configuring automation for the workflow.
See below for a description of the available settings shown in figure 2.10.
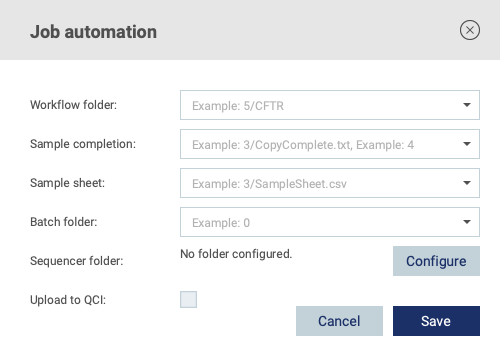
Figure 2.10: Automation configuration
Workflow folder
The sequencer should be configured to place samples belonging to a given analysis workflow into a workflow specific subfolder (see figure 4.1) to allow the connector to determine which files should be submitted to which workflow. The Workflow folder setting should be configured using the folder level notation (see Definition of folder level notation). All sample files inside the workflow folder (and its subfolders) will be submitted for analysis.
If the workflow folder contains multiple subfolders, for example one called good_samples with sample files of good quality that should be submitted to the analysis workflow, and one called bad_samples with sample files of low quality that should not be submitted for analysis, this information can be appended to the folder level notation like so (the provided folder level should match the provided <workflow folder> not the good_samples folder):
<folder level>/<workflow folder>/good_samples
In addition, if information in the filenames of the sample files should be used to determine if a sample should be submitted, this can also be appended to the folder level notation. For example, if the configured folder contains sample files starting with HEPATITIS_ that should be submitted to a HEPATITIS specific workflow, and sample files starting with LYMPHOMA_ that should be submitted to a LYMPHOMA specific workflow, the configuration for the HEPATITIS workflow could look as follows:
<folder level>/<workflow folder>/good_samples/HEPATITIS_*.fastq.gz
If filename information has been added, the full path to the files relative to the workflow folder must be provided. If for example the sample files are placed in sample specific subfolders inside the good_samples folder, a wildcard can be used to match these folders like so:
<folder level>/<workflow folder>/good_samples/*/HEPATITIS_*.fastq.gz
Sample completion
See Definition of sample completion for information about sample completion.
If copy-complete detection is used, sample completion should be configured using the folder level notation (see Definition of folder level notation).
If files-per-sample detection is used, sample completion should be configured by defining the number of files the sequencer produces per sample.
Sample sheet
Optional if the analysis workflow does not require a sample sheet. See Definition of sample grouping for information about sample sheet grouping.
The sample sheet should be configured using the folder level notation (see Definition of folder level notation).
Batch folder
Optional
By default, the output from the analysis workflow will be placed in a folder of the following format:
<workflow>/<sample ID>_<timestamp>
If the Batch folder setting is provided, the format changes to:
<workflow>/<batch ID>/<sample ID>_<timestamp>
where <batch ID> is the name of the folder that the Batch folder setting points to. The setting should be configured using the folder level of the batch folder (see Definition of folder level notation).
Sequencer folder
The filesystem path to the folder that should be monitored for output from the sequencer.
Upload to QCI
Check this box if the results should be uploaded to QCI. Should only be enabled for analysis workflows that produce a QCI compatible bundle.