Recycle bins
When users delete data from the Navigation Area of their CLC Workbench, it is placed in a recycle bin. Each user has an individual recycle bin in each File Location they have access to, including CLC Server File System Locations.
The recycle bin is a special concept that is not included in the permission control system. Any permissions applied to the data prior to deletion are no longer in effect. A particular user's recycle bin can only be accessed by themselves and by administrative users. It is not possible to grant other users permission to access data in your recycle bin.
The recycle bin without a name beside it contains data deleted in versions of the CLC Server predating the concept of a per-user recycle bin. It can only be accessed by server administrators by selecting Show All Recycle Bins.
An exception: Deletion of data held in a CLC Server file system location named CLC_References is different than for other file system locations. Please refer to the section on Reference data management for details.
Recycle bins can be configured to automatically be emptied after a specified period. Server administrators can also access and empty the recycle bins of other users through the web administrative interface or using a CLC Workbench acting as a client for the CLC Server. We describe these functionalities below.
Enabling and configuring automatic cleanup of recycle bins
Recycle bins in any File System Location can be automatically emptied. By default this functionality is not enabled. When it is enabled, the default is to remove data that has been in the recycling bin for more than 100 days. To configure automatic emptying of recycle bins, go to the Configuration tab, and click on the Automatic recycle bin cleanup header. Click on the Configure button beside a File System Location (figure 8.1).
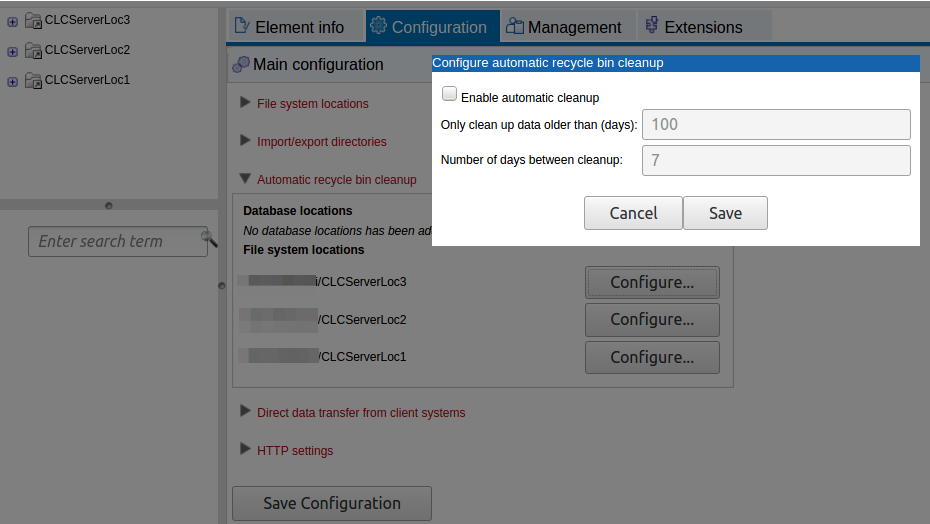
Figure 8.1: Click on the Configure button beside a location to enable and configure automatic cleanup of the recycle bins in that area.
The recycle bin without a name beside it, which contains data deleted in versions of the CLC Server predating the concept of a per-user recycle bin, is not emptied by the automatic cleanup facility.
Emptying recycle bins using the web administrative interface
When logged into the web administrative interface, go to the Element info tab. All recycle bins in a given location will be listed at the bottom of the location listing in the Navigation Area.
All recycle bins in a given location can be emptied in a single action, by clicking on a File Location or any folder or element in that location in the Navigation Area, and clicking on the button to Empty All Recycle Bins... under the Info tab.
An individual recycle bin can be emptied by clicking on it in the Navigation Area, and then clicking on the Empty Recycle Bin... bin button under the Info tab.
You will be asked for confirmation before contents of recycle bins are deleted.
The listing of recycle bins in a given location can be refreshed at any time by going to the Navigation Area, closing the folder containing those recycle bins, and then opening that folder again.
Emptying recycle bins using a CLC Workbench
If you are not already logged into the CLC Server from the CLC Workbench as an administrative user, log in by selecting the menu option:
Connections | CLC Server Connection (![]() )
)
Then list all the recycle bins at the bottom of the server File System Location in the Navigation Area, as shown in figure 8.2:
right-click the recycle bin (![]() ) | Location | Show All Recycle Bins
) | Location | Show All Recycle Bins
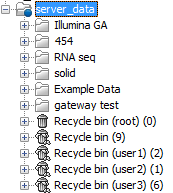
Figure 8.2: Showing all recycle bins for a particular server File System Location.
Administrators an also empty the recycle bin of a particular user:
right-click the recycle bin (![]() ) | Empty
) | Empty
All recycle bins can be emptied in one go:
right-click the data location (![]() ) | Location | Empty All Recycle Bins
) | Location | Empty All Recycle Bins
Please note that these operations cannot be undone.