Perform TSO500 DNA Analysis
The Perform TSO500 DNA Analysis (Illumina) workflow includes all necessary steps for processing paired-end reads from TSO500 DNA samples, such as sample QC, adapter trimming, somatic variant calling, TMB score calculation and CNV analysis when control samples are provided.
The workflow can be found in the Toolbox at:
Template Workflows | Biomedical Workflows (![]() ) | TSO Panel Analysis (
) | TSO Panel Analysis (![]() ) | Perform TSO500 DNA Analysis (Illumina) (
) | Perform TSO500 DNA Analysis (Illumina) (![]() )
)
If you are connected to a CLC Server via your Workbench, you will be asked where you would like to run the analysis. We recommend that you run the analysis on a CLC Server when possible.
In the next step, select the DNA sequencing reads to analyze. The input can be sequence lists containing paired-end reads selected from the Navigation Area, or samples can be imported using the "Select files for import" option, where files containing paired-end read data can be selected from disk. If choosing the "Select files for import" option, the "Paired reads" option needs to be enabled.
If you would like to analyze more than one sample in one workflow run, check the "Batch" box in the lower left corner of the dialog. When running multiple imported samples, metadata needs to be provided. Further information can be found at http://resources.qiagenbioinformatics.com/manuals/clcgenomicsworkbench/current/index.php?manual=Running_workflows_in_batch_mode.html.
After selecting reference data as described below you can configure the batch unit and see the batch overview. When using metadata, selecting an Excel file that describes the data will often be the most convenient method. Providing metadata directly from an Excel file is the only option available when input data is imported as part of the workflow run.
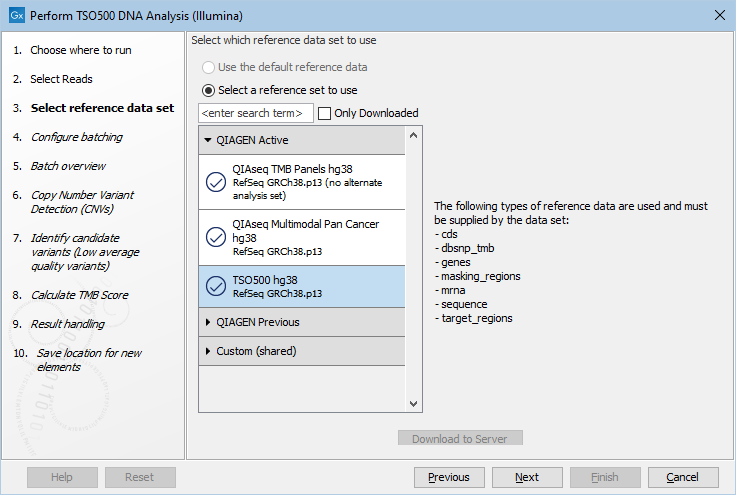
The following dialog helps you set up the relevant Reference Data Set. If you have not downloaded the Reference Data Set yet, the dialog will suggest the relevant data set and offer the opportunity to download it using the Download to Workbench button. The dialog for selection of reference data is shown in figure 18.2.

Figure 18.2: The relevant Reference Data Set is highlighted. The text to the right lists the types of references needed by the workflow.
Note that if you wish to Cancel or Resume the Download, you can close the template workflow and open the Reference Data Manager where the Cancel, Pause and Resume buttons are available.
If the Reference Data Set was previously downloaded, the option "Use the default reference data" is available and will ensure the relevant data set is used. You can always check the "Select a reference set to use" option to be able to specify another Reference Data Set than the one suggested.
In the next step, the Average quality cutoff for high UMI evidence SNP variants can be adjusted. This might need adjustment depending on the UMI grouping, where 2-4 UMI on average is good. A higher number of reads per UMI could indicate fragmented or bad input DNA and hence lead to lower average quality scores even for high UMI count samples. Besides, this can affect coverage and will show up as untrustworthy TMB score estimates due to low coverage (<100x coverage) in the 1 MB region required for TMB estimation.
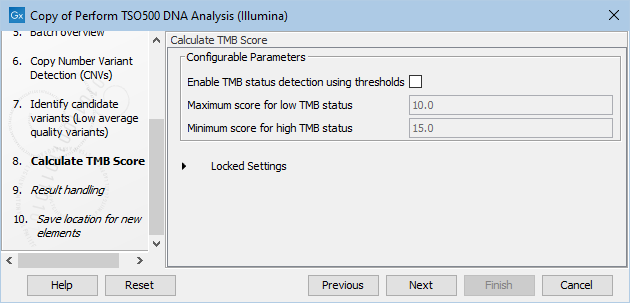
The next step, Calculate TMB score, has the following Configurable Parameters (figure 18.3):
- Enable TMB status detection using thresholds: When enabled, the TMB status can be calculated using thresholds by customizing the minimum and maximum scores to consider when calculating the TMB status. When enabled, the TMB report will include a TMB status calculated using the specified Maximum score for low TMB status and the Minimum score for high TMB status.
- Maximum score for low TMB status: A score of maximum this value will be considered having low TMB status. Scores above this value will be considered intermediate or high MB status, depending on what is specified for Minimum score for high TMB status.
- Minimum score for high TMB status: A score of minimum this value will be considered having high TMB status. Scores below this value will be considered intermediate or low TMB status, depending on what is specified for Maximum score for low TMB status.

Figure 18.3: In this dialog you can Enable TMB status detection using thresholds if you would like to base the calculation of TMB status on specific minimum and maximum scores for high and low TMB status, respectively.
Finally, choose where to save the results.
Subsections
