Filtering tables
The final concept to introduce is Filtering.
A button called Filter to selection allows for reducing the size of a table to a few pre-selected rows. The option Filter to selected rows will keep in the table view only the rows that are selected, whether they were selected manually, or by using the function "Select in other views" available for some tables (for example when the table is associated with a graphical view such as a Venn diagram, or a volcano plot). Restore the complete table by choosing the option Clear selection filter.
In the top right corner of a table view, a filter field can be used to filter a table as well. This table filter has an advanced and a simple mode.
The simple mode is the default and is applied simply by typing text or numbers (see an example in figure 3.27).
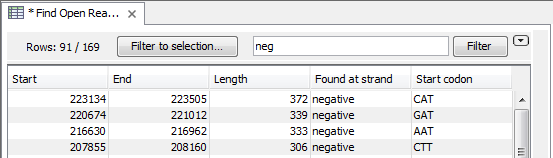
Figure 3.27: Typing "neg" in the filter in simple mode.
Typing "neg" in the filter will only show the rows where "neg" is part of the text in any of the columns. The text does not have to be in the beginning, thus "ega" would give the same result. This simple filter works fine for fast, textual and non-complicated filtering and searching. Filtering is automatic once you start typing, unless you are working with a table with more than 10000 rows, in which case you have to actually click the Filter button for the filtering to take effect.
In the advanced mode, you can make use of numerical information or make more complex filter combinations using more than one criterion in the filter.
Click the Advanced filter (![]() ) button to open the first criterion of the advanced filter.
Criteria can be added or removed by clicking the Add (
) button to open the first criterion of the advanced filter.
Criteria can be added or removed by clicking the Add (![]() ) or Remove (
) or Remove (![]() ) buttons. At the top, you can choose whether all the criteria should be fulfilled (Match all), or if just one of the needs to be fulfilled (Match any).
) buttons. At the top, you can choose whether all the criteria should be fulfilled (Match all), or if just one of the needs to be fulfilled (Match any).
For each filter criterion, you first have to select which column it should apply to.
Next, you choose an operator. For numbers, you can choose between:
- = (equal to)
- < (smaller than)
- > (greater than)
- <> (not equal to)
- abs. value < (absolute value smaller than. This is useful if it doesn't matter whether the number is negative or positive)
- abs. value > (absolute value greater than. This is useful if it doesn't matter whether the number is negative or positive)
Note, that the number of digits displayed is a formatting option which can be set in the View Preferences. The true number may well be (slightly) larger. This behaviour can lead to problems when filtering on exact matches using the = (equal to) operator on numbers. Instead, users are advised to use two filters of inequalities (< (smaller than) and > (greater than)) delimiting a (small) interval around the target value.
For text-based columns, you can choose between:
- starts with (the text starts with your search term)
- contains (the text does not have to be in the beginning)
- doesn't contain
- = (the whole text in the table cell has to match, also lower/upper case)
 (the text in the table cell has to not match)
- is in list (The text in the table cell has to match one of the items of the list. Items are separated by comma, semicolon, or space. This filter is not case-sensitive.)
- is not in list (The text in the table cell must not match any of the items of the list. Items are separated by comma, semicolon, or space. This filter is not case-sensitive)
Once you have chosen an operator, you can enter the text or numerical value to use.
The advanced filter criterion mentioned above are also available from a menu that appears by right-clicking on a value in a table: just specify the operator, and the column and value where you right-clicked for the menu to appear will define the two other fields of the advanced filter.
If you wish to reset the filter, simply remove (![]() ) all the search criteria. Note that the last one will not disappear - it will be reset and allow you to start over.
) all the search criteria. Note that the last one will not disappear - it will be reset and allow you to start over.
Figure 3.28 shows an example of an advanced filter which displays the open reading frames larger than 400 that are placed on the negative strand.
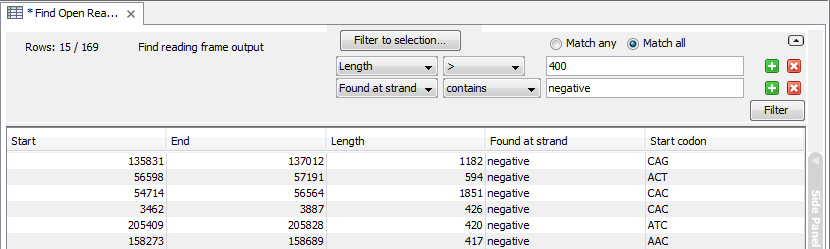
Figure 3.28: The advanced filter showing open reading frames larger than 400 that are placed on the negative strand.
Both for the simple and the advanced filter, there is a counter at the upper left corner which tells you the number of rows that pass the filter (91 in figure 3.27 and 15 in figure 3.28).