Track lists
A Track List (![]() ) allows multiple tracks based on a compatible reference genome to be seen in a single view, supporting comparative analysis (figure 27.15).
) allows multiple tracks based on a compatible reference genome to be seen in a single view, supporting comparative analysis (figure 27.15).
A track list consists of references to tracks, which are then shown together in the View area. Track lists do not directly contain the track data. Rather, they contain references to the relevant track elements. When a track referred to by a track list cannot be found, the text "Unresolved track" is displayed for that track in the track list.
See the end of this section for information relating to copying track lists.
Creating track lists
Track lists can be created in several ways:
- Using the Create Track List tool, available from:
Toolbox | Utility Tools (
 ) | Tracks (
 ) | Create Track List (
 )
)
This tool can also be launched using the Create Track List button, visible at the bottom of individual tracks when they are open in the View Area.
- In the top Toolbar, go to:
New (
 ) | Track List ()
This option can also be found under the File menu.
- By selecting one or more tracks in the Navigation Area and dragging them onto a track based on a compatible genome that is open in Track view.
This creates a new track list containing the selected tracks and the track they were dragged onto.
- Using the Create Track List element in a workflow (see Track lists as workflow outputs).
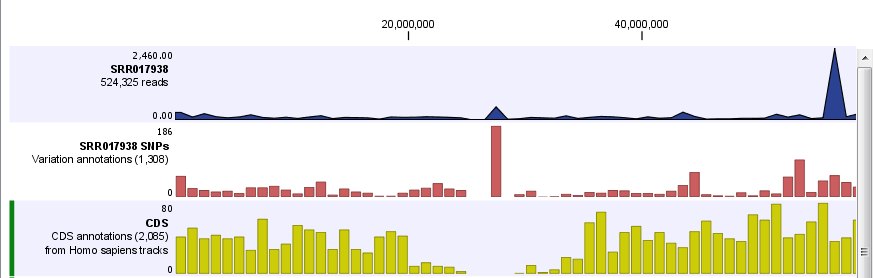
Figure 27.15: A track list referring to 3 tracks. By zooming into a given location, the details of the read mapping (top track), variants(middle track) and overlapping CDS annotations (bottom track) can be investigated.
Different views of the data are available using the icons at the bottom of an open track list. Of note is the Chromosome Table view (![]() ), which provides a summary of the data contained in the tracks referred to by the track list. The table in this view contains one row per chromosome, and one column per track in the track list.
), which provides a summary of the data contained in the tracks referred to by the track list. The table in this view contains one row per chromosome, and one column per track in the track list.
Working with tracks in track lists
Tracks can be re-ordered within track lists by dragging them up and down in the open view. Tracks can also be easily added and removed. In addition, linked views of selected tracks can be opened, allowing quick navigation to areas of interest in the genome.
Right-clicking on any of the tracks opens up a context menu (figure 27.16). The options presented vary, depending on the track type. The following options relating to track organization are commonly shown:
- Open This Track Open the track in a linked view.
Individual tracks can also be opened in a linked view by double-clicking on the track name in the track list or by depressing the Ctrl key (
 on macs) and clicking on the name of the track to open.
Some track types open in a table view by default. Clicking on a row in a linked table view causes the focus in the track list to jump to the corresponding location. See Showing a track in a table.
General information about linked views is available in Linked views.
- Remove Track Remove the track from the track list.
- Include More Tracks Add tracks to the track list. Any track based on a compatible genome can be added.
Tracks can also be added to an open track list by dragging them from the Navigation Area into the open track list view.
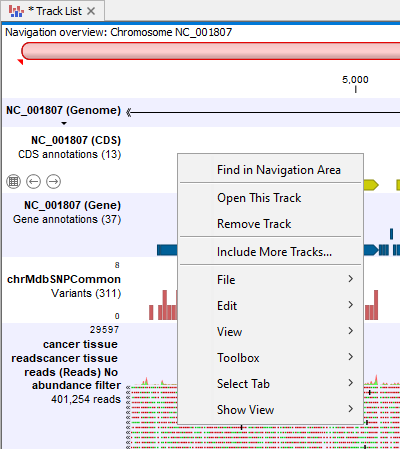
Figure 27.16: Right-click on a track to reveal options relating to handling and organize tracks within the track list.
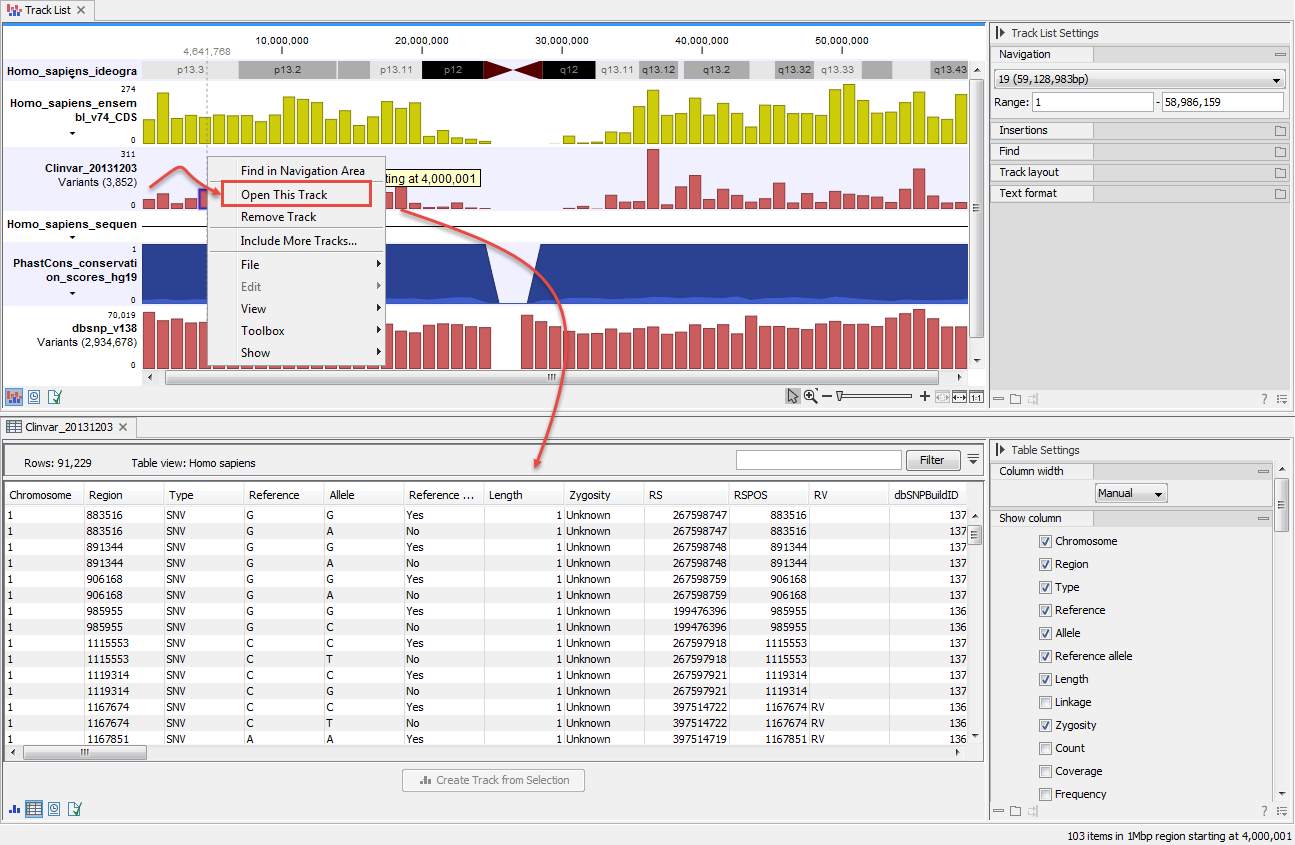
Figure 27.17: A linked table view of a track is opened by right-clicking on the track in the track list and then selecting "Open This Track".
Making copies of track lists
Track lists can be copied like any other data element (see Moving and copying elements). If a track list is copied by itself, then the new copy will refer to the same tracks as the original.
To copy a track list and have the new copy refer to new copies of the tracks, copy the track list and all the tracks it refers to in a single copy action. If a subset of the tracks referred to are copied, then references to the copied tracks are updated, while references to the original tracks are maintained for those not copied.