Workflow creation and configuration
Creating a workflow
To create a workflow for Genomics Analysis Portal for CLC Genomics Server 21.0 you must be using a licensed version of CLC Genomics Workbench 21.0. To use functionality provided by plugins, those plugins must be installed on both the CLC Genomics Workbench and CLC Genomics Server. For commercial plugins, licenses must be present on both systems.
The information in this section focuses on special requirements when creating workflows to be launched using the Genomics Analysis Portal.
Information about creating workflows is provided in the CLC Genomics Workbench manual at https://resources.qiagenbioinformatics.com/manuals/clcgenomicsworkbench/current/index.php?manual=Creating_workflow.html. How to modify existing workflows using the Open Copy of Workflow function is also described there.
Note: When users start an analysis from the Genomics Analysis Portal, all workflow parameters will be locked regardless of whether they are locked in the original workflow design.
Configuring quality control criteria
If you wish to use the Genomics Analysis Portal quality control functionality for your workflow, insert the workflow element Create Sample Report in the workflow design and configure the quality control report section. Instructions for this are given in the CLC Genomics Workbench manual at https://resources.qiagenbioinformatics.com/manuals/clcgenomicsworkbench/current/index.php?manual=Create_Sample_Report.html.
Link an output element to the "Report" output channel of the Create Sample Report element.
Tip: Even if you do not wish to use quality control reporting, Create Sample Report is generally useful for creating one combined sample report that can be exported as a PDF format file.
Once all workflow elements are in place, the workflow input elements need to be configured.
Configuring workflow input elements
Configuration of workflow input elements is described in the CLC Genomics Workbench manual at https://resources.qiagenbioinformatics.com/manuals/clcgenomicsworkbench/current/index.php?manual=Configuring_input_output_elements.html.
It is not necessary to lock any parameters. When a workflow is started using the Genomics Analysis Portal, all parameters will be locked regardless.
For workflows to be launched using the Genomics Analysis Portal, take the following steps for workflow input elements:
- For primary inputs
- Enable import of raw data using on-the-fly import only.
- Restrict the available importers to the one importer relevant for your data, e.g. Illumina.
- Configure the selected importer by clicking on the Configure Parameters button to open the "Configure parameters" dialog (figure 3.1).
- For parameter inputs, e.g. configuring a reference data input
- For each workflow input element connected to a parameter input channel, select the relevant data element, e.g. a reference sequence.
Note: It is not possible to use workflow roles when configuring parameter inputs in workflows to be launched using Genomics Analysis Portal, as it is not possible to select a Reference Data Set when starting the analysis.
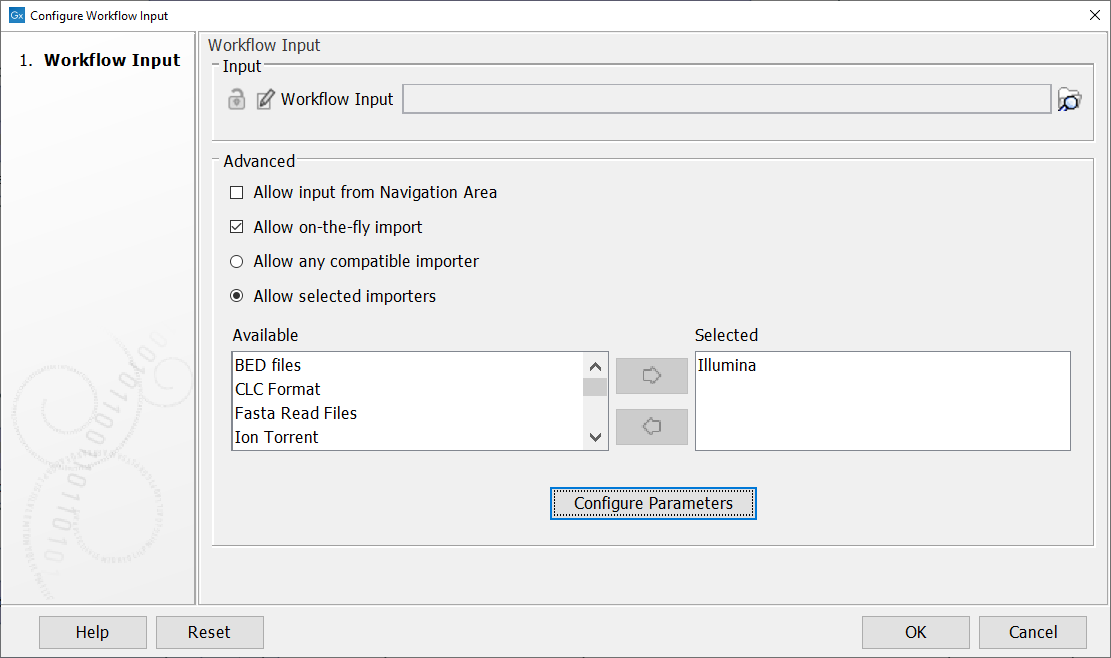
Figure 8: Configure the importer to be used for on-the-fly import. - For each workflow input element connected to a parameter input channel, select the relevant data element, e.g. a reference sequence.
Workflow output and export elements
Connect an output element to each output channel generating results you want to have available as a workflow output that can be opened in a CLC Genomics Workbench.
Connect an export element to each output channel generating results you want to have available for download and use with other tools, for example VCF or BED format files. For export elements, leave the "Export destination" empty. The Genomics Analysis Portal export location is set in the CLC Genomics Server administration interface rather than in the workflow export elements.
Checking your workflow configuration
To quickly check all the required inputs have been configured, step through the workflow wizard. If you are able to proceed all the way to the last wizard step without having to select input other than the initial fastq and a (dummy) destination for export elements, your workflow can be installed on the CLC Server.
To step through the workflow wizard:
- Click on the Run button at the bottom of the Workflow Editor.
- Choose to run the job on the CLC Server (or Grid if relevant for your setup). Click on Next.
- Browse to select a random fastq file on your system as the primary workflow input. You will not actually be analyzing the fastq file, you just need to select one to proceed in the wizard. Click on Next.
- Go through the remaining steps to check that input has been selected for all required input fields.
Note: If your workflow includes export elements, you will need to select an export destination for the purpose of proceeding through the wizard steps. When run on Genomics Analysis Portal the workflow will use the export destination that was configured by the CLC Server administrator.
- When you get to the last wizard step, click on Cancel.