How to create atom groups
Atom groups can be created in different ways. When atoms are selected in the 3D view, brown spheres indicate which atoms are included in the selection. The selection will appear as the entry "Current" in the Selections category in the Project Tree.
Convert a selection to an atom group
To convert the current selection into an atom group, select the Current entry in the Project Tree, and from the right-click context menu choose 'Create Group from Selection' to make an atom group with exactly the selected atoms, or choose 'Create Group from Selection plus Context' to include whole residues or molecules in the atom group.
Note that an atom group can be renamed. Select the atom group in the Project Tree and invoke the right-click context menu. Here, the Rename option is found.
- Double click to select Click on an atom to select it. When you double click on an atom that belongs to a residue in a protein or in a nucleic acid chain, the entire residue will be selected. For small molecules, the entire molecule will be selected. The atom selection can then be converted to an atom group as described above.
- Adding atoms to a selection Holding down Ctrl while picking atoms, will pile up the atoms in the selection. All atoms in a molecule or category from the Project Tree, can be added to the "Current" selection by choosing "Add to Current Selection" in the context menu. Similarly, whole molecules can be removed from the current selection via the context menu. The atom selection can then be converted to an atom group as described above.
- Spherical selection Hold down the shift-key, click on an atom and drag the mouse away from the atom. Then a sphere centered on the atom will appear, and all visible atoms inside the sphere will be selected. The status bar (lower right corner) will show the radius of the sphere. The current atom selection can then be converted to an atom group as described above.
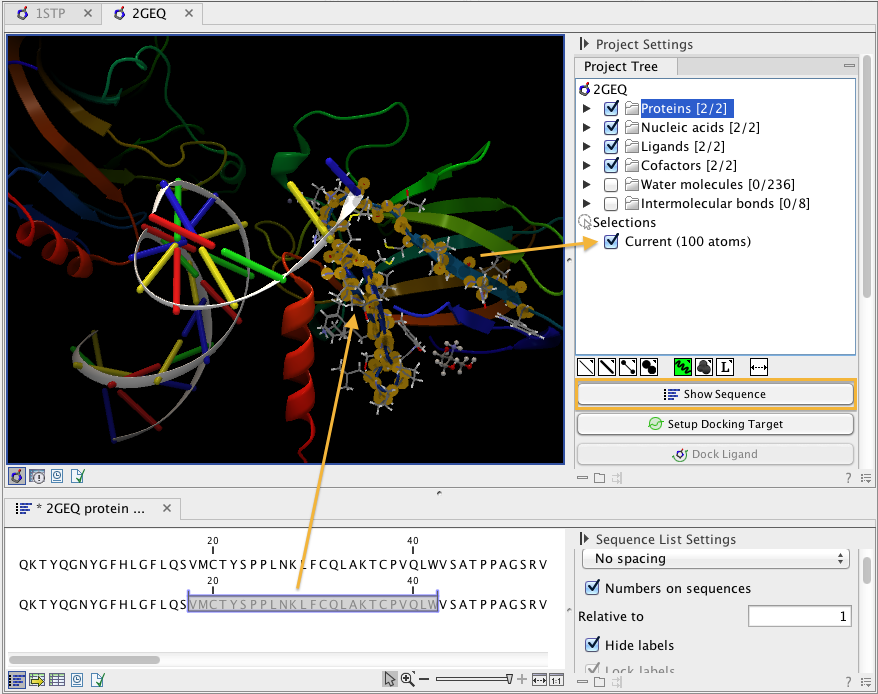
- Show Sequence Another option is to select protein or nucleic acid entries in the Project Tree, and click the 'Show Sequence' button found below the Project Tree. A split-view will appear with a sequence list editor for each of the sequence data types (Protein, DNA, RNA) (figure 13.11). If you go to the protein (or nucleic acid) sequence that was opened with the "Show Sequence" button and select a region in the sequence, the selected residues will show up as the "Current" selection in the 3D view and the Project Tree view. The atom selection can then be converted to an atom group as described above. Notice that the link between the 3D view and the sequence editor is lost if either window is closed, or if the sequences are modified.
- Atom group with nearby atoms When just one molecule is selected in the Project Tree, the context menu on the molecule entry contains an option to create an atom group comprising molecules and residues within 5 ï¿12 of the selected molecule (Create Nearby Atoms Group). This will create an entry in the Atom groups category. A 'Nearby Atoms Group' can also be created from binding pocket entries (binding pockets can only be created in CLC Drug Discovery Workbench).
- Atom group with interacting binding site atoms If a Binding Site Setup is present in the Project Tree, the context menu on ligands and docking results has a 'Binding Site Interactions' menu. Here, the 'Create Interacting Atoms Group' will create an atom group containing molecules and residues included in the Binding Site Setup, and within 5 ï¿12 of the selected molecule. A Binding Site Setup can only be created using the CLC Drug Discovery Workbench.

Figure 13.11: The protein sequence in the split view is linked with the protein structure. This means that when a part of the protein sequence is selected, the same region in the protein structure will be selected.

