The Identify QIAseq DNA Variants ready-to-use workflows
There are four Identify QIAseq DNA Variants ready-to-use workflows, each optimized to work with either somatic or germline application, from Illumina or Ion Torrent reads.
Somatic/germline specificity: For somatic variant detection, the ready-to-use workflow uses the Low Frequency Variant Detection tool, a variant caller which does not base its statistical model on a bi-allelic assumption, thus will declare a site heterozygous if it detects more than one allele at a site even if one of the alleles is detected at very low frequency and later filtered out. For germline applications, the workflows use the Fixed Ploidy Variant Detection tool. This variant caller has higher precision than the Low frequency Variant Detection tool, particularly at low to moderate levels of coverage (< 30x). At high levels of coverage (>100x) the Fixed Ploidy Variant Detection tool will exhibit low sensitivity for variants with allele frequencies far from what is expected for germline variants (that is 50 or 100%).
Illumina/Ion Torrent specificity: Among various differences in the filtering strategy between both sequencing technology, the workflow for Ion Torrent reads includes an extra step that removes non SNV type variants that are likely due to artifacts.
For each case, configuration of the parameters are optimized to obtain high sensitivity and specificity in detecting variants.
All workflows work using the same Reference Data Set: before starting any one of the workflows, open the Reference Data Manager, select QIAseq DNA Panels hg19, Download the set if you have not done so before and close the References Management window.
The Identify QIAseq DNA Variants ready-to-use workflow can be found here:
Ready-to-Use Workflows | QIAseq Panel Analysis | QIAseq Analysis workflows | Identify QIAseq DNA (Somatic/Germline) Variants (Illumina/Ion Torrent) (![]() )
)
Double-click on the Identify QIAseq DNA Variants ready-to-use workflow relevant for your samples to run the analysis. If you wish to run a workflow in batch mode, please start the workflow using the QIAseq panel analysis.
If you are connected to a CLC Server via your Workbench, you will be asked where you would like to run the analysis. We recommend that you run the analysis on a CLC Server when possible. Click Next.
The following dialog helps you set up the relevant Reference Data Set. If you have not downloaded the Reference Data Set yet, the dialog will suggest the relevant data set and offer the opportunity to download it using the Download to Workbench (figure 3.1).
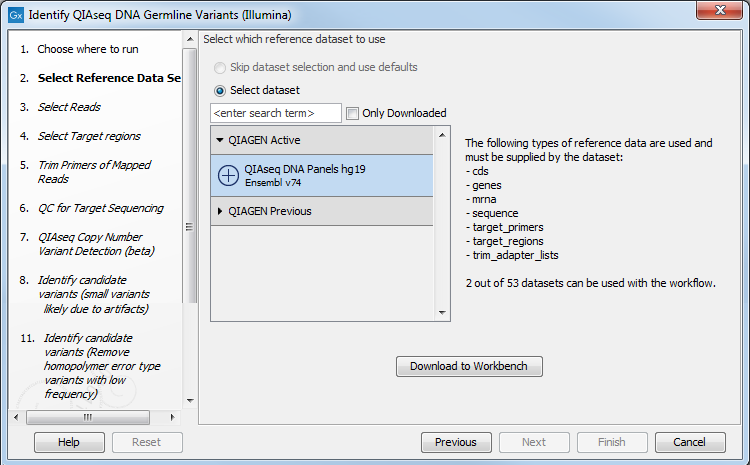
Figure 3.1: The relevant Reference Data Set is highlighted; in the text to the right, the types of reference needed by the workflow are listed. There is also an indication of how many data set can be used with the workflow. In this case, the other data set would only be visible when opening the "QIAGEN Previous" folder.
Note that if you wish to Cancel or Resume the Download, you can close the ready to use workflow and open the Reference Data Manager where the Cancel, Pause and Resume buttons are available.
If the Reference Data Set was previously downloaded, the option "Skip data set selection and use defaults" is available and will ensure the relevant data set is used. You can always check the "Select data set" option to be able to specify another Reference Data Set than the one suggested.
In the Select reads dialog, specify the sequencing reads that should be analyzed (figure 3.2).
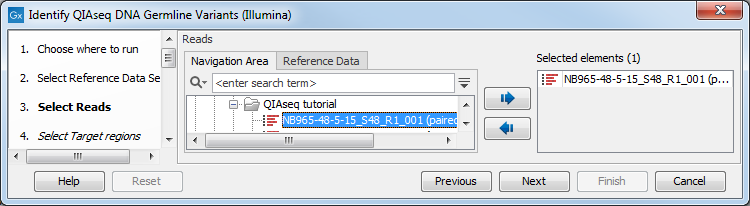
Figure 3.2: Select the sequencing reads by double-clicking on the file name or by clicking once on the file name and then on the arrow pointing to the right hand side.
In the next dialog (figure 3.3), specify the relevant target region BED file. You may have imported this file in the Navigation Area yourself, or you can find it in the CLC_References folder after you downloaded the QIAseq DNA Panels hg19 Reference Data Set with the Reference Data Manager. In general, the easiest way to find a file that belongs to a Reference Data Set is to use the Reference Data tab (instead of the Navigation Area tab), where the Reference Data is organized by Reference Data Set.
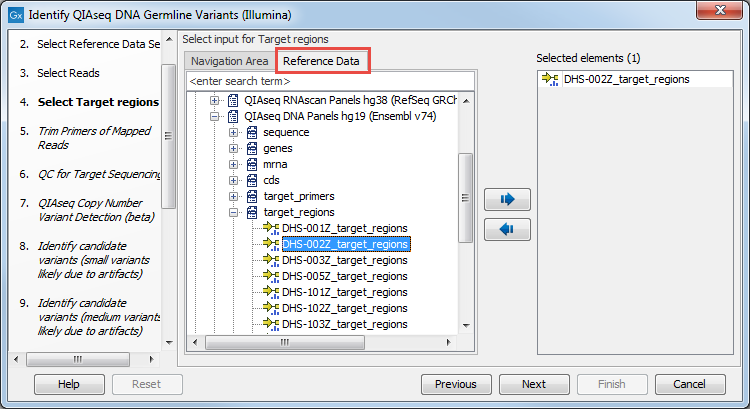
Figure 3.3: Select the target regions file specific to the panel used.
In the "Trim Primers of Mapped Reads" dialog, select the primer track specific to the QIAseq DNA Panel you used to generate the sequenced reads (figure 3.4). This primer file can be imported ahead of running the workflow using the Import QIAGEN primers tool, or it can be found in the CLC_References folder after you downloaded the QIAseq DNA Panels hg19 Reference Data Set with the Reference Data Manager. Again, the easiest way to access that file is to look for it using the Reference Data tab.
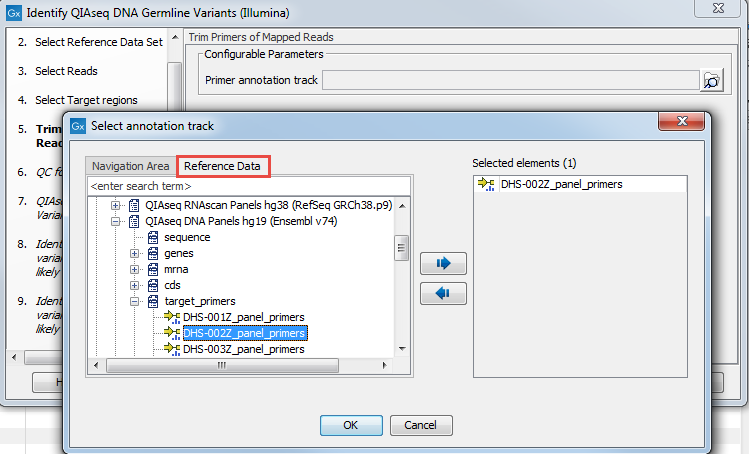
Figure 3.4: Select the primer file specific to the panel you are analyzing.
Warning! Reads spanning the end of the MT chromosome (wrapped reads) will not be trimmed by the Trim Primers of Mapped Reads tool when running the Identify QIAseq DNA Variants ready-to-use workflow on DHS-105Z.
In the dialog called "QC for Target Sequencing", you can modify the Minimum coverage needed on all positions in a target for this target to be considered covered (figure 3.5). Note that the default value for this tool depends on the application chosen (somatic or germline).
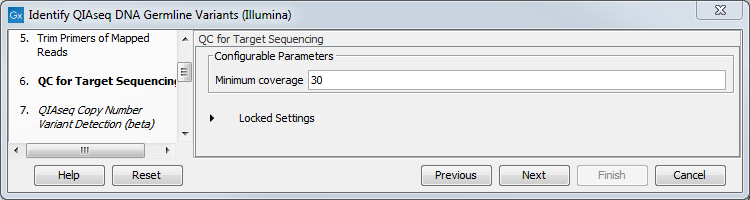
Figure 3.5: Setting the Minimum coverage parameter of the QC for Target Sequencing.
The dialog for "Copy Number Variant Detection" allows you to specify a control mapping against which the coverage pattern in your sample will be compared in order to call CNVs. If you do not specify a control mapping the Copy Number Variation analysis will not be carried out. If you have previously run the workflow with control data, you will find the mapping in the Reports and Data folder (Mapped UMI Reads).
Please note that if you want the copy number variation analysis to be carried out it is very important that the control mapping that you supply the tool with is meaningful as a control for the sample that you are analyzing. A meaningful control must satisfy two things: it must (1) have a copy number status that it is meaningful for you to compare you sample against and (2) it must be a read mapping that has been processed in the same manner that you sample has been processed. To ensure (1), it is important for panels with targets on the X and Y chromosomes that the control and sample are of the same gender. You can ensure (2) by processing the sample that you want to use as control with the workflow (without control mapping to the CNV detection component) and use the resulting UMI reads track as controls in subsequent runs of the workflow.
Finally, although the parameters for the Low Frequency Variant Detection tool are not adjustable, they have been set to generate an initial pool of all potential variants that are filtered in the following steps. A series of dialog will now remove variants that are either:
- not significant enough: filtering is performed based on the QUAL value, value that weighs count against coverage and error rate.
- likely due to artifacts: a called variant must be of sufficient quality, and have an un-biased read direction or read position presence (using the values "Average quality", "Read position test probability" and "Read direction test probability").
- homopolymer errors (indels occuring in a homopolymer stretch) using a too low frequency cut-off value.
- too infrequent.
Some filters only filters alternative alleles - and not reference alleles - as this potentially lead to wrong interpretation of variants by the VCF exporter where such variants could be misinterpreted as hemizygote when the reference allele is missing.
Note that each filter has specific default values depending on the technology (Illumina / Ion torrent) and application (somatic or germline) chosen. These filtering steps have been configured to provide the best sensitivity and precision in the variants output by each workflow. However, benchmarking was performed on samples of relatively high coverage. Therefore, additional filtering might be needed, or filtering values adjusted when working with low coverage samples. This can only be done by running the workflows listed in the Toolbox, and not by using the panel guide. When configuring filters, do not load any annotations, nor try to change the name of the filters in the first column, as it would disable the filter completely.
Finally, in the last wizard step, choose to Save the results of the workflow and specify a location in the Navigation Area before clicking Finish.
Subsections
- Output from the Identify QIAseq DNA Variants workflow
- Quality Control for the Identify QIAseq DNA Variants workflow