Start a QIAseq panel analysis
The Analyze QIAseq Panel Analysis guide offers a series of pre-installed ready-to-use workflows for which all settings have already been set to optimize the results of your secondary analysis.
The Guide dialog offers three tabs, one for each category of applications: Targeted DNA, Targeted RNAscan, Targeted RNA. On each tab, all available QIAseq analysis workflows are displayed in a list. For Targeted DNA Panels, click on the little arrow next to the analysis workflow of your choice to access the relevant workflow configuration (figure 2.6).
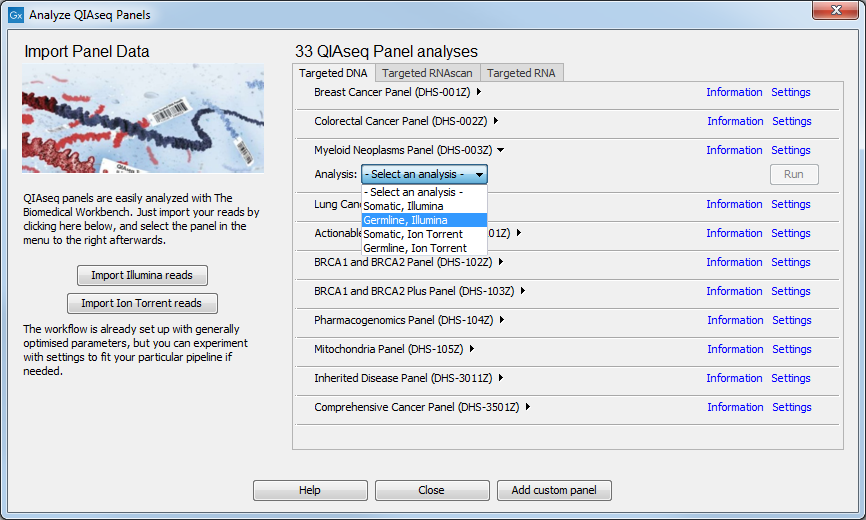
Figure 2.6: Selecting the relevant panel analysis.
Once you are ready to start the workflow of your choice (including the relevant configuration when several are available using the drop down menu), click Run.
If you are connected to a CLC Server via your Workbench, you will be asked where you would like to run the analysis. We recommend that you run the analysis on a CLC Server when possible. Click Next.
You can then select the sequencing reads that should be analyzed (figure 2.7). Note that the workflow can be run in batch mode, i.e., you can select several read files that will be processed independently.

Figure 2.7: Select the sequencing reads.
Depending on the application, you may be offered to edit some parameters. For Targeted DNA panels, the parameters are as seen in figure 2.8.
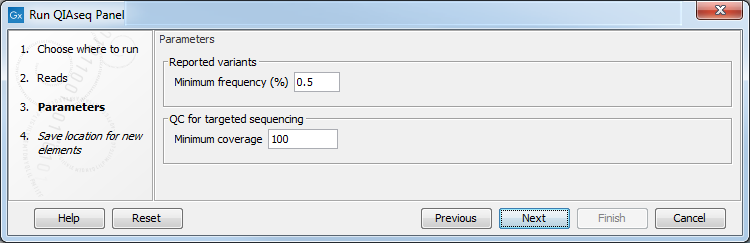
Figure 2.8: Parameters to configure for Targeted DNA workflows, here set at the default values for somatic variant detection.
- Reported variants minimum frequency: the variant's frequency needs to be above that threshold for the variant to be output by the workflow in the filtered variant track. Default settings for Targeted DNA panels are set for somatic variant detection at 0.5%, and at at 20% for germline variant detection. While this value can be adjusted, note that the Unfiltered variant track is produced by the Low Frequency Variant Detection tool run with a frequency cut-off value of 0.5 for somatic workflows, 1.0 for germline workflows. Therefore, it does not make sense to filter the variants with a value lower than 0.5 in case of somatic application, and 1.0 in case of germline application.
All variants found will be output in the Unfiltered variants track, while only the variants passing a series of filtering, including this configurable parameter, will be output in the Variant passing filters track.
- QC for targeted sequencing minimum coverage: this value will be used in the Coverage Report output by the workflow: it is set at 100 for somatic workflows, at 30 for germlines workflows
In the last dialog, choose where you want to save the outputs of the workflow. A description of the output - including help to perform quality control of your data and interpretation of your results - are given in the following application-specific chapters.
For DNA panel QC, see Quality Control for the Identify QIAseq DNA Variants workflow.
For RNAscan panels interpretation, see Interpretation of the Detect QIAseq RNAscan Fusions results.